WARDOGS Artillery Guide: How to Use the SPH 2 Tank
Illustrated WARDOGS artillery guide for the SPH 2: unlock at level 55, park 1,600-2,000 m out, stabilize, aim with map coordinates, and fast-reload between shots.
FAQ
How do you unlock the SPH 2 artillery tank in WARDOGS?
How far can the SPH 2 shoot in WARDOGS?
What ammo does the SPH 2 use in WARDOGS?
How does the fast reload work on the artillery tank?
The artillery tank is the quietest map-wide threat in this shooter, and almost nobody drives it: a $400,000 unlock, a ballistic free-aim gun and a seat full of unlabeled ladders scare most players off. Yet one patient SPH 2 gunner can shell objectives while three factions brawl over a control zone kilometers away. This illustrated walkthrough rebuilds StratzFPS’ complete War College artillery tutorial into eight steps, each with a verified screenshot and a deep link to the exact moment it is demonstrated.
Source and Verification Card
| Field | Detail |
|---|---|
| Vehicle | SPH 2 (artillery armored vehicle) |
| Armament | L52 cannon (155 mm high-explosive) + roof M249 |
| Max effective range | ~2,700 m |
| Recommended gun line | 1,600–2,000 m from team spawn |
| Unlock | War Dog level 55 + $400,000 (one-time), $8,000 per deployment |
| Source channel | StratzFPS |
| Source video | How To Use Artillery Tanks in WARDOGS — War College Ep. 4 |
StratzFPS — How To Use Artillery Tanks in WARDOGS (War College Ep. 4)
Step 1: Unlock the SPH 2 at the Vehicle Vendor
The artillery tank stays locked until your War Dog account level hits 55, and the unlock itself costs $400,000 at the vehicle vendor. After that one-time purchase, every deployment runs $8,000. Unlike the vehicles below it in the menu, there is no driver level to grind — the account level is the only gate.
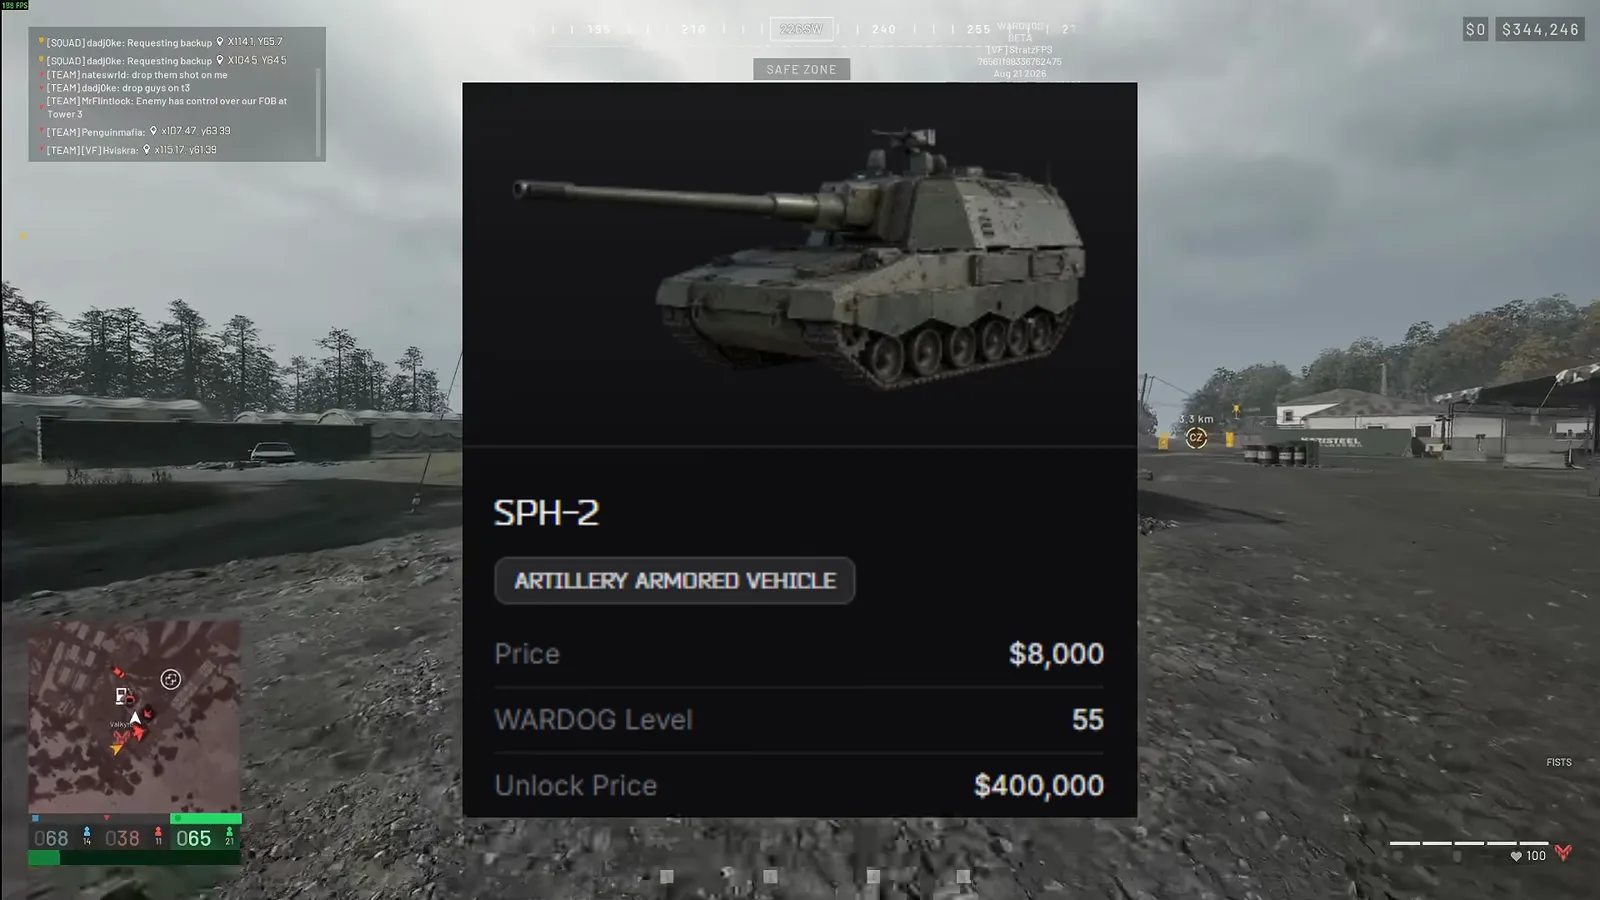 Step 1 (0:42) — The vendor card settles it: a level 55 gate, $400,000 to unlock once, then $8,000 every time you roll it out.
Watch the vendor unlock (0:35)
Step 2: Spawn It, Load 155 mm Shells, Decide on a Crew
A horn beep confirms the buy: the tank spawns under one of the awnings beside your team spawn. Climb in and hit B for the ammo menu — stack as many shells as you can, and buy 5.56 for whoever mans the roof M249. It seats three (driver, gunner, M249 gunner), but the host’s honest take is that one man suffices: park it, dismount and lay the gun yourself.
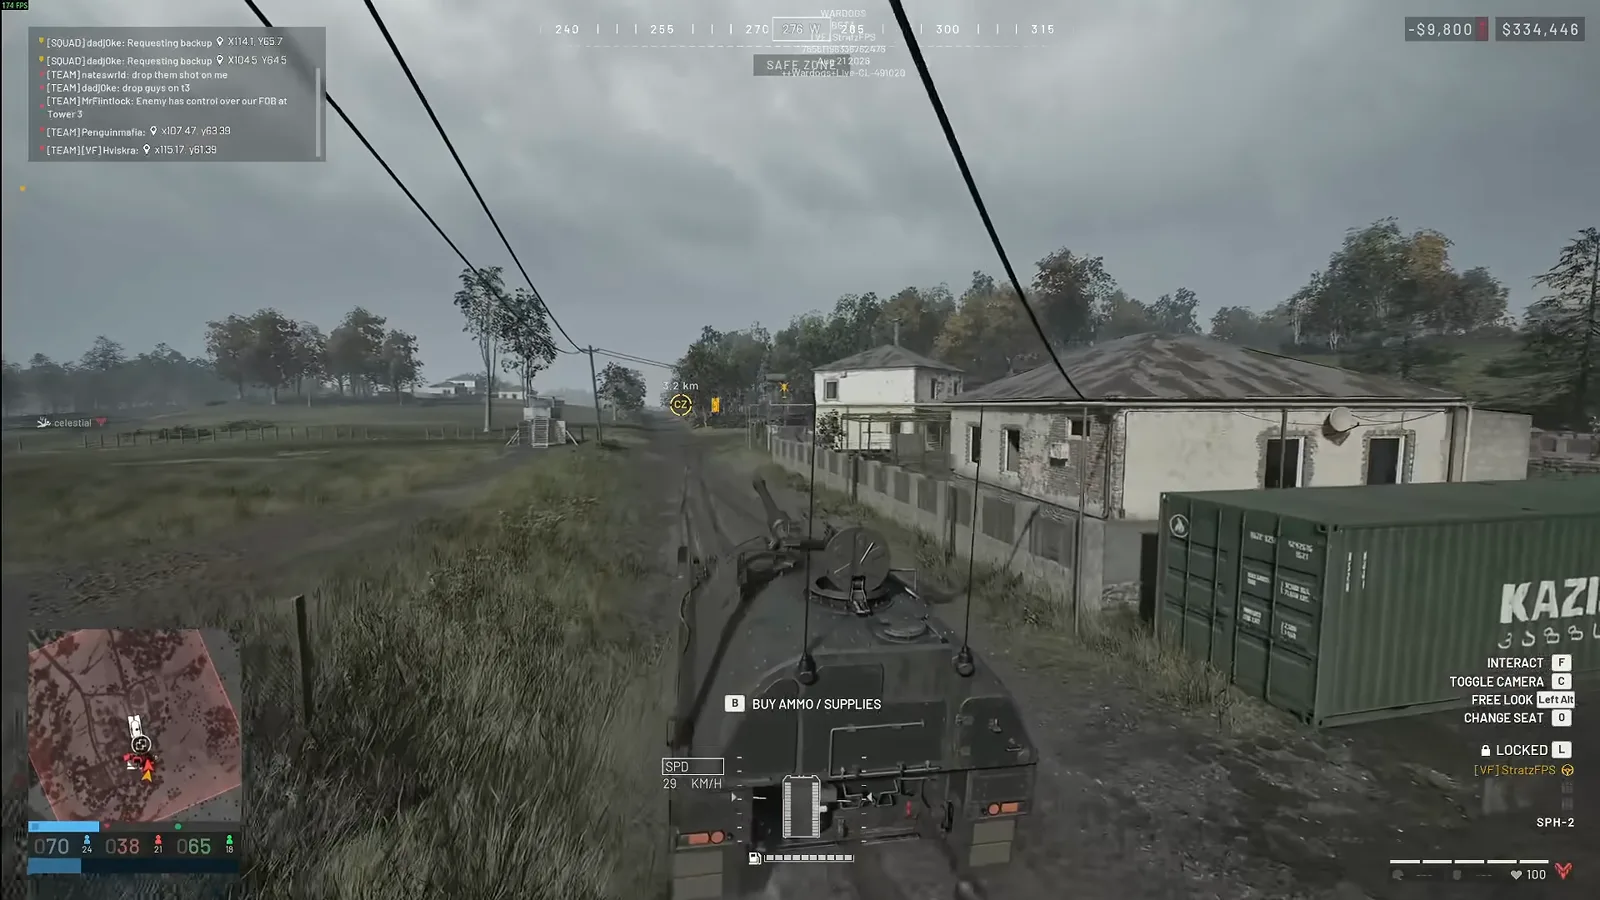 Step 2 (1:30) — Fresh off the horn beep: the howitzer waits by the spawn containers, and the ammo buy prompt sits right on the hull.
Watch the spawn and ammo buy (1:05)
Step 3: Park 1,600–2,000 m From Your Spawn
Positioning is half of artillery gameplay. The SPH 2’s maximum effective range is around 2,700 m, and parking 1,600–2,000 m out (map dependent) reaches every target inside the control zone while keeping RPG infantry out of range — they have to travel to you. To pre-check a spot, the community runs a “WARDOGS artillery calculator” website (linked in the video’s description): enter your parking point and it shows whether the objectives sit inside your reach, on a second monitor or phone.
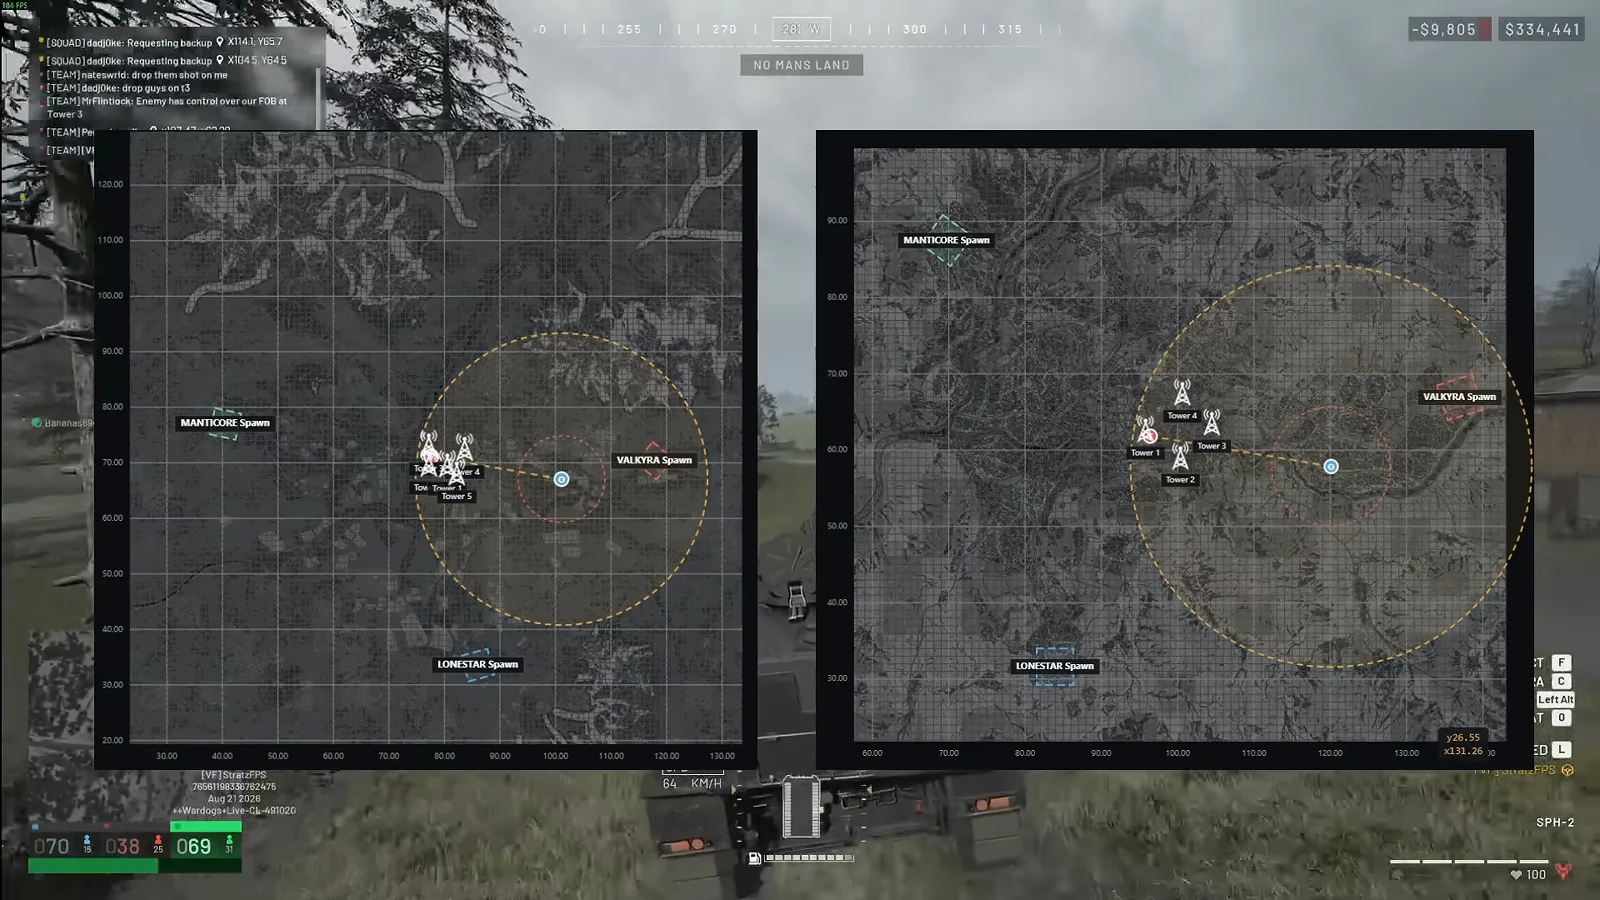 Step 3 (3:15) — Both launch maps side by side with their reach arcs drawn: if the dashed circle misses the fight, move the gun before the first shell.
Watch the parking-range breakdown (2:35)
Step 4: Kill the Engine and Stabilize
At the spot, stop the engine first: silence lets you hear incoming helicopters and infantry, and an idling engine burns the fuel you may need to drive back to HQ for shells. Then scroll down to run the stabilization sequence — the bottom label flips from “Unstabilized” to stabilized, and the turret holds your crosshair on the same spot after every shot. The host cannot emphasize this step enough.
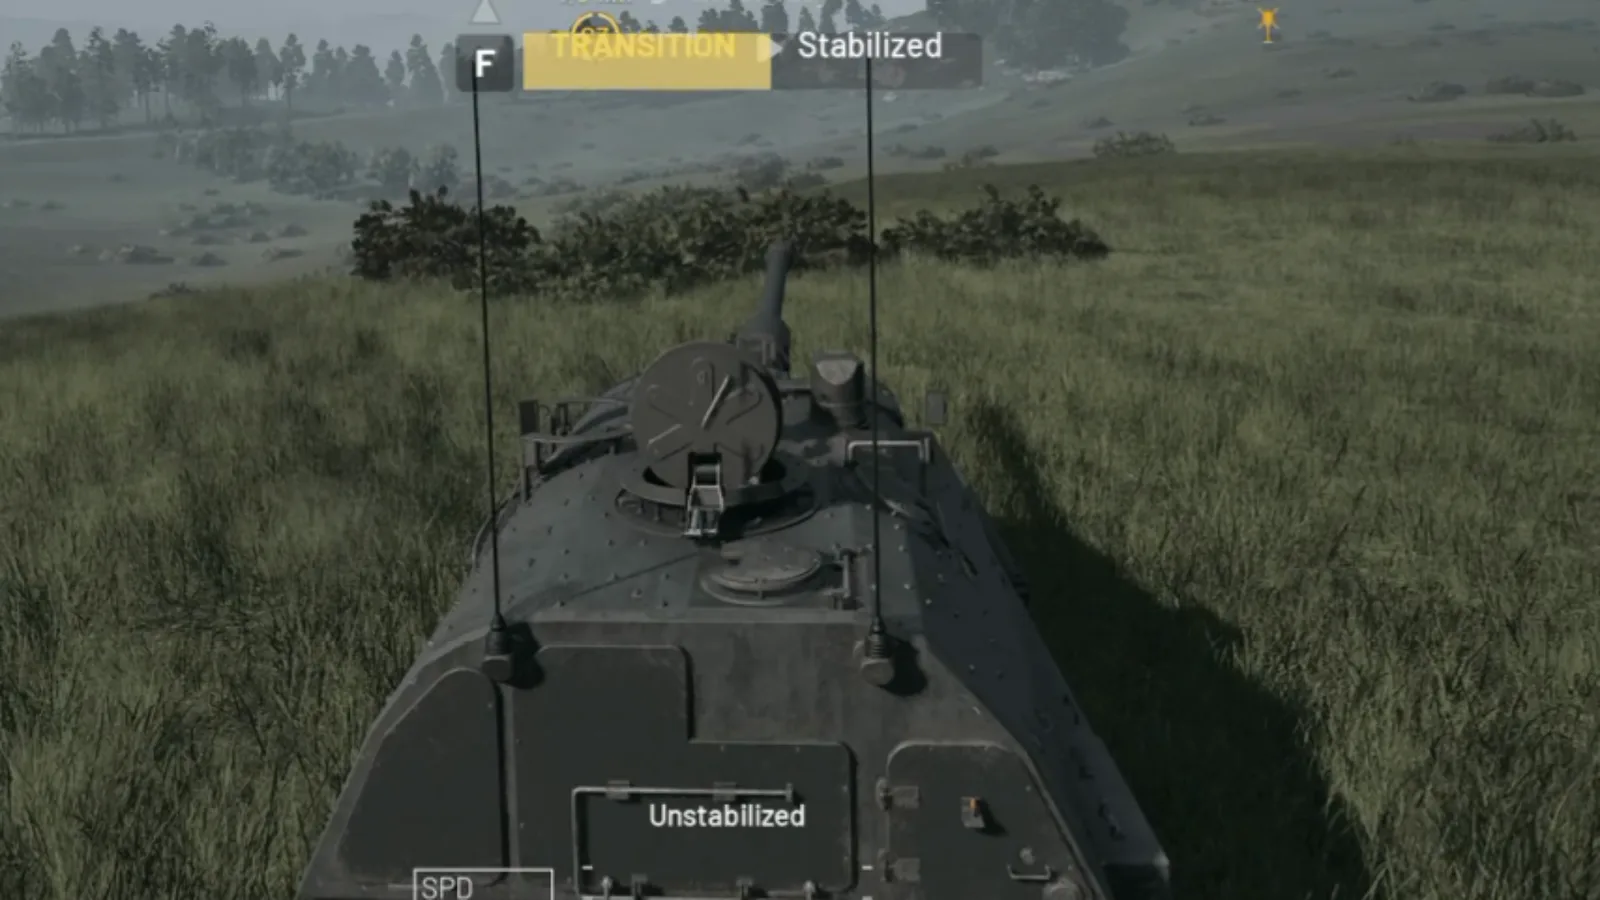 Step 4 (4:00) — The stabilization moment itself: engine cold, hull still flagged Unstabilized, and the Transition prompt one press away from locking the crosshair down.
Watch the engine-off and stabilization routine (3:35)
Step 5: Read the Tactical Map Like a Fire Direction Officer
Good artillery starts on the map, not behind the gun. The distance scale depends on zoom — each square is 1 km zoomed out and 100 m zoomed in — with coordinate rulers along the edges; the host reads his position between the 11 and 12 km markers. Hover the cursor anywhere and the map prints that spot’s X and Y coordinates. Our maps and tactics guide breaks the grid system down in more depth.
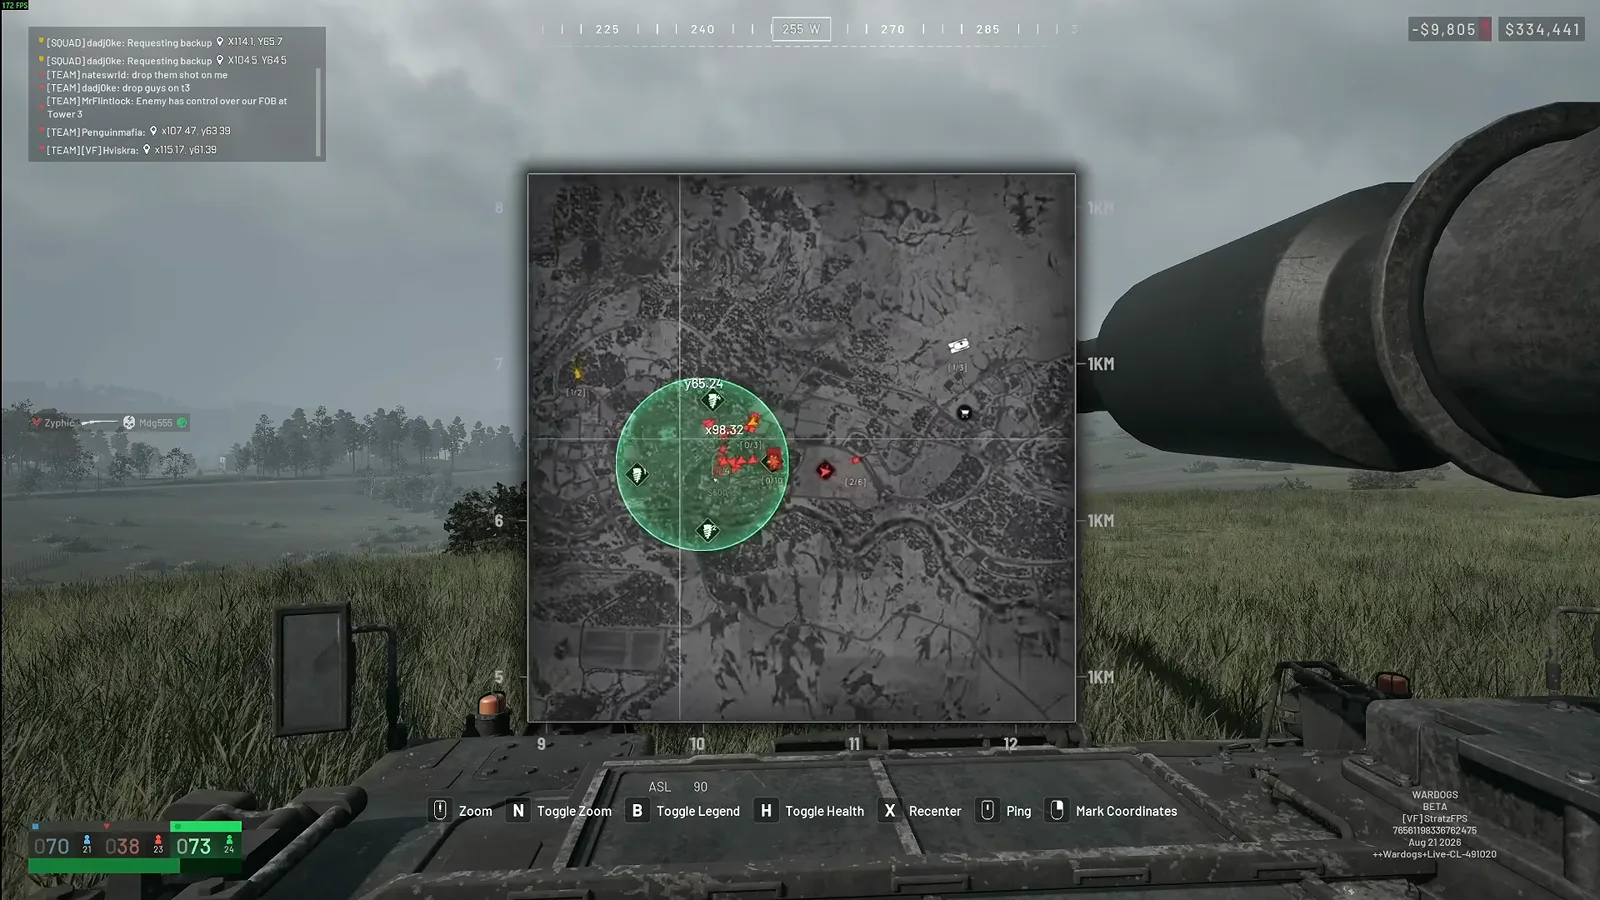 Step 5 (3:50) — Cursor parked on the red target cluster: exact grid digits print at the cursor while the edge ruler keeps the kilometer count honest.
Watch the map scale explanation (4:55)
Step 6: Subtract Coordinates and Let Pythagoras Handle the Rest
Now the arithmetic the whole guide hangs on. Sitting left or right of the target, take your X minus the target’s X; sitting north or south, subtract the Y values instead. Diagonal angles happen in every match, so the host reaches for the high-school Pythagorean theorem: feed it the two legs and you have your working range — or skip the math with the calculator from Step 3.
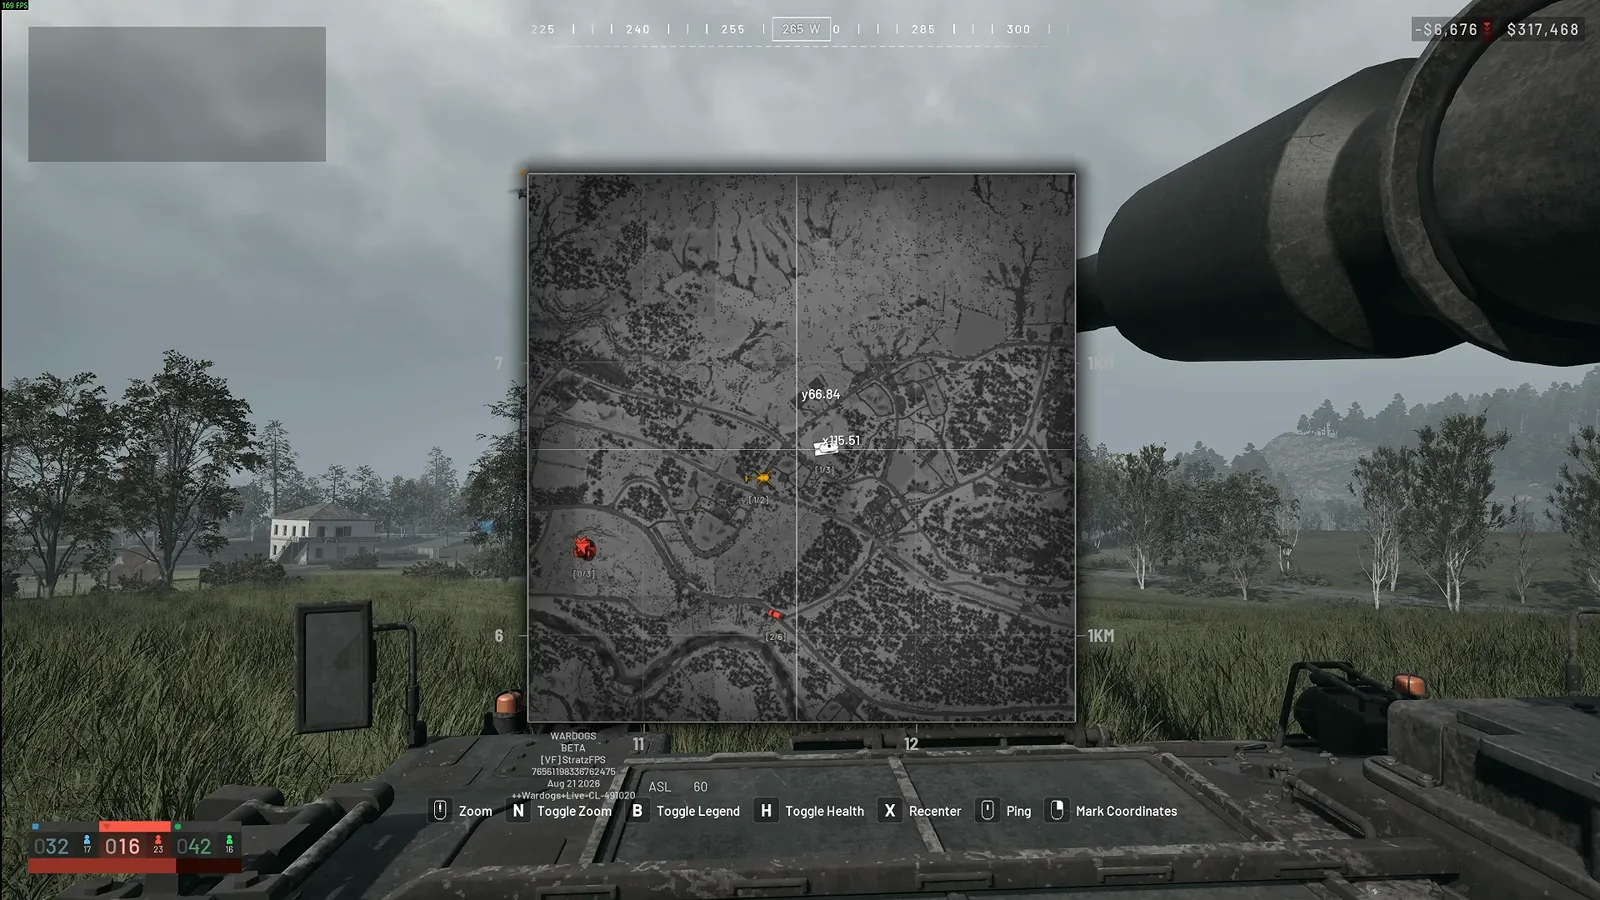 Step 6 (5:00) — The crosshair readout is the entire method: read the target’s digits, subtract your own, and the gap in each axis becomes your firing solution.
Watch the coordinate subtraction (5:10)
Worked subtraction example (our numbers, the video's method)
Say your tank sits at x 96.2 / y 98.5 and the target cluster reads x 112.9 / y 105.2:
- X leg: (112.9 − 96.2) × 100 = 1,670 m
- Y leg: (105.2 − 98.5) × 100 = 670 m
- Straight-line range: √(1670² + 670²) ≈ 1,799 m
Right inside the 1,600–2,000 m band from Step 3. The same subtraction drives the towed L81 in our mortar walkthrough, so the skill transfers between both indirect-fire platforms.
Step 7: Lay the Turret and Walk Your Rounds In
Aiming is the hardest part of the tank, and the video is refreshingly honest about it: expect practice, and expect your first shell to land embarrassingly short — the host’s demonstration round did. Use the sight to put the tube where the math pointed: a compass ruler across the top (the boxed 255 W is where the gun currently points), a range ladder marked RNG in meters down the left, and a mil ladder marked MIL down the right. Stabilization pins the crosshair, so you can watch the impact and walk the next shell onto the target.
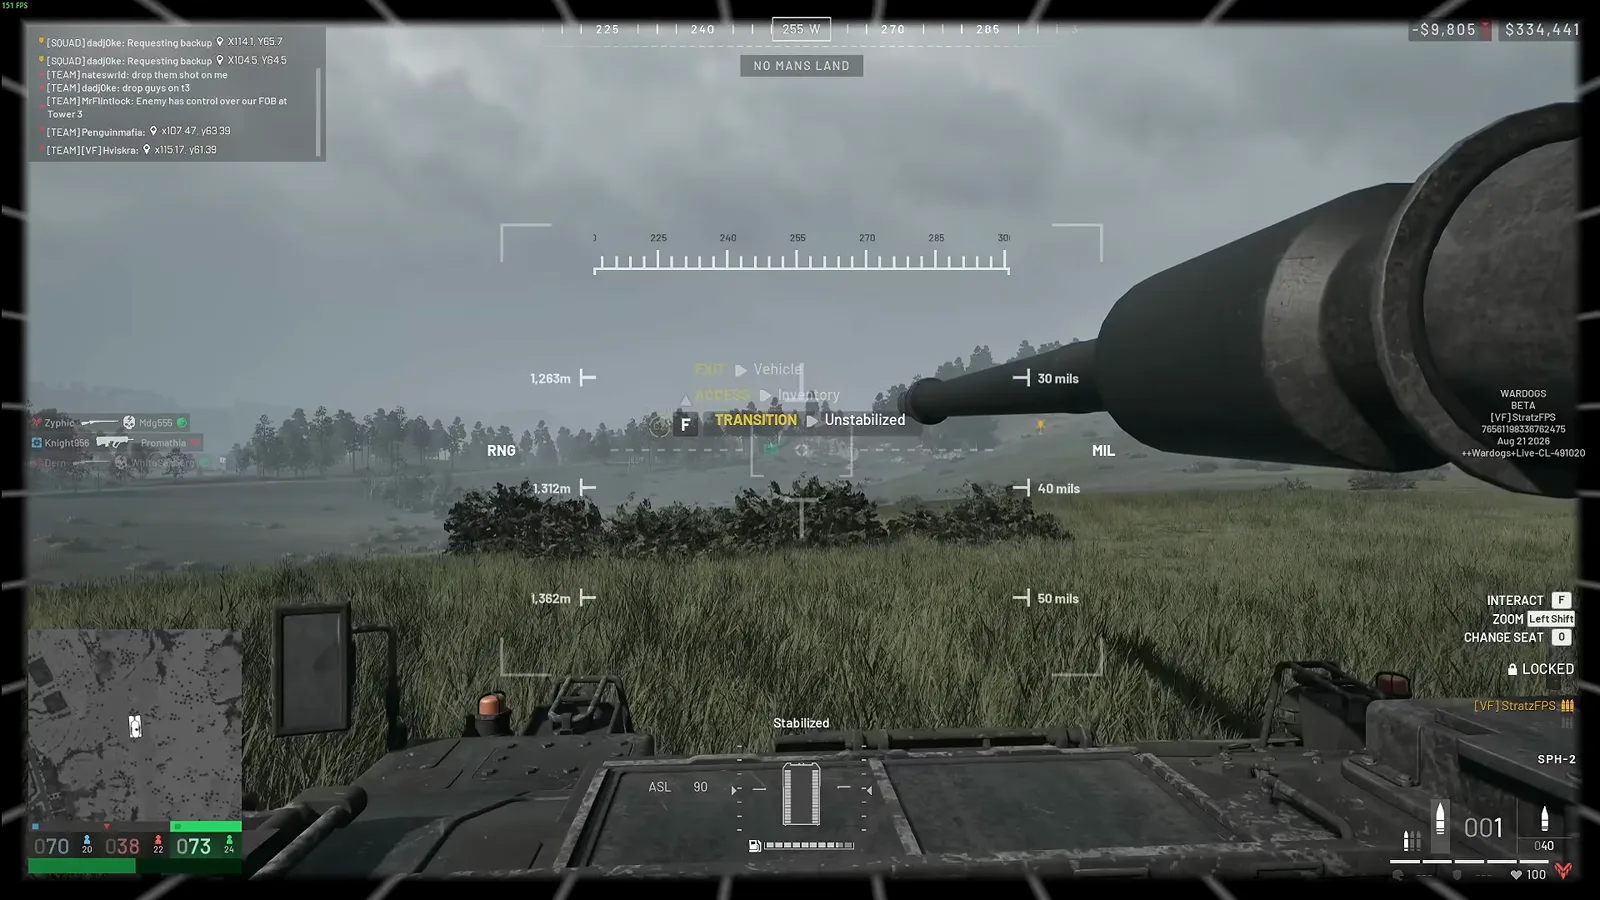 Step 7 (3:45) — Lay the tube on the computed line, send the shell, and read the impact: the first round is a survey shot, not the kill shot.
Watch the aiming segment (4:30)
Step 8: Start the Reload Minigame After Every Shot
The best tempo trick in the video: the moment a shell leaves the barrel, press R to start the reload sequence instead of waiting out the timer. A ring of arrow prompts (W, A, S, D or the arrow keys) appears — hit each in the shown direction and the crew rams the next 155 mm round far faster than the countdown. One wrong press resets the timer, so: slow is smooth, smooth is fast.
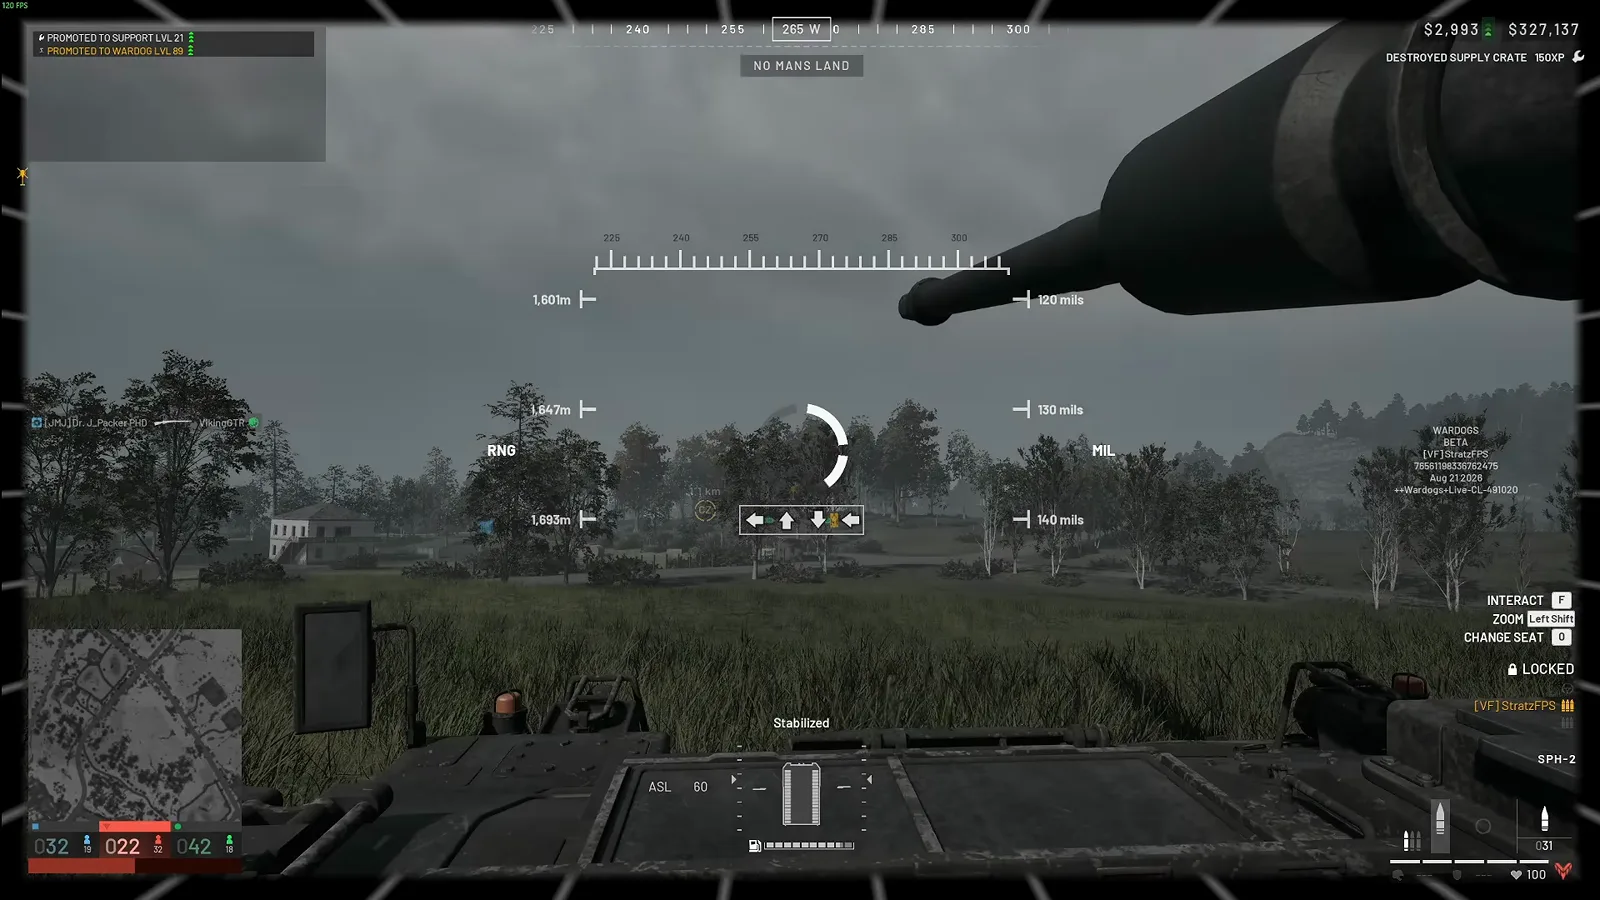 Step 8 (6:47) — Tap R as the blast clears and the arrow ring appears: clean inputs shave seconds off every cycle, sloppy ones cost you the whole timer.
Artillery Rules of Thumb
- Unlock once, budget forever — $400,000 opens the SPH 2 permanently, but every lost tank is $8,000 gone; our money-making guide keeps the account solvent.
- Distance is armor — at 1,600–2,000 m the RPG squads have to march to you, and the engine-off silence warns you first.
- Stabilize before the first shell — an unstabilized tube throws away every correction you just earned.
- Same math, smaller tube — the coordinate subtraction works identically for the towed L81 in our mortar walkthrough, and the FOB combat walkthrough covers the supply line that keeps both guns fed.
Reconstructed frame-by-frame from StratzFPS’ War College episode 4; we will track SPH 2 balance changes through Early Access. If the $400,000 unlock feels far away, our cash-making guide and the vehicle economy breakdown cover the grind end to end. Keeping a gun line alive is a building job — the FOB building guide covers placement and supplies, and the anti-tank guide covers the moment armor overruns it.
Related Articles
fixes
WARDOGS Connection Error and Server Down Fixes: Queue, Ping, Disconnects
Fix WARDOGS connection errors, stuck queues, high ping and match disconnects in Early Access with a server-first triage ladder before you touch your PC.
guides
WARDOGS Money Guide: Fastest Cash Methods in Early Access
Illustrated WARDOGS money guide: helicopter passenger drops, logistics pallets, supply crates, spawn-vehicle runs and medic income for fast early-game cash.
guides
WARDOGS Medic Revive Guide: Defibs, Bandages & Payouts
Illustrated WARDOGS medic guide: charge the defibrillator, bandage live teammates, drag downed players to cover, and bank revive payouts and tips.
Was this helpful?
Thanks for the feedback!