WARDOGS Stingray Drone Walkthrough: Build, Launch and Kill From the FPV
A frame-checked WARDOGS Stingray drone walkthrough: place the launcher, pay 900 spare parts and $5,000 a flight, then fly yaw and pitch only.
FAQ
What does the Stingray drone cost in WARDOGS?
Can you roll the Stingray drone in WARDOGS?
Which direction should the Stingray launch tube face?
Is the Stingray worth it against a single tank?
How Does the Stingray Drone Work in WARDOGS?
You buy it at a FOB, it launches out of a tube like a mortar shell, and it flies into the top of someone’s tank. That is the entire loop — but everything that makes it good is also what makes it awkward: no roll, huge turn radius, a battery that drains while you fight the aircraft handling, and a stockpile of mechanical supplies you do not control.
This walkthrough rebuilds the Stingray from launch-tube placement to terminal dive, using only what is visible on screen in the source footage plus what the player narrates while doing it.
Source and Verification Card
| Field | Detail |
|---|---|
| System | Stingray launcher and FPV drone (remote-controlled UAV) |
| Cost per flight | 900 mechanical spare parts + $5,000 |
| Core keys | B logistics menu · Left Shift boost · Left Ctrl brake · Left Alt free look · C eject |
| Runtime | 9:06 |
| Source channel | StratzFPS |
| Source video | FPV Drones in WARDOGS Are TERRIFYING |

StratzFPS — FPV Drones in WARDOGS Are TERRIFYING (full Stingray breakdown)
Step 1: Build the FOB Before You Think About Drones
The launcher is not a vehicle you spawn — it is a FOB asset, and the panel that sells drones pulls from that FOB’s mechanical stockpile. That means the first job is the unglamorous one: get a base standing with the large hammer, and keep feeding it BUILD SUPPLIES until the spare-parts number is worth spending.
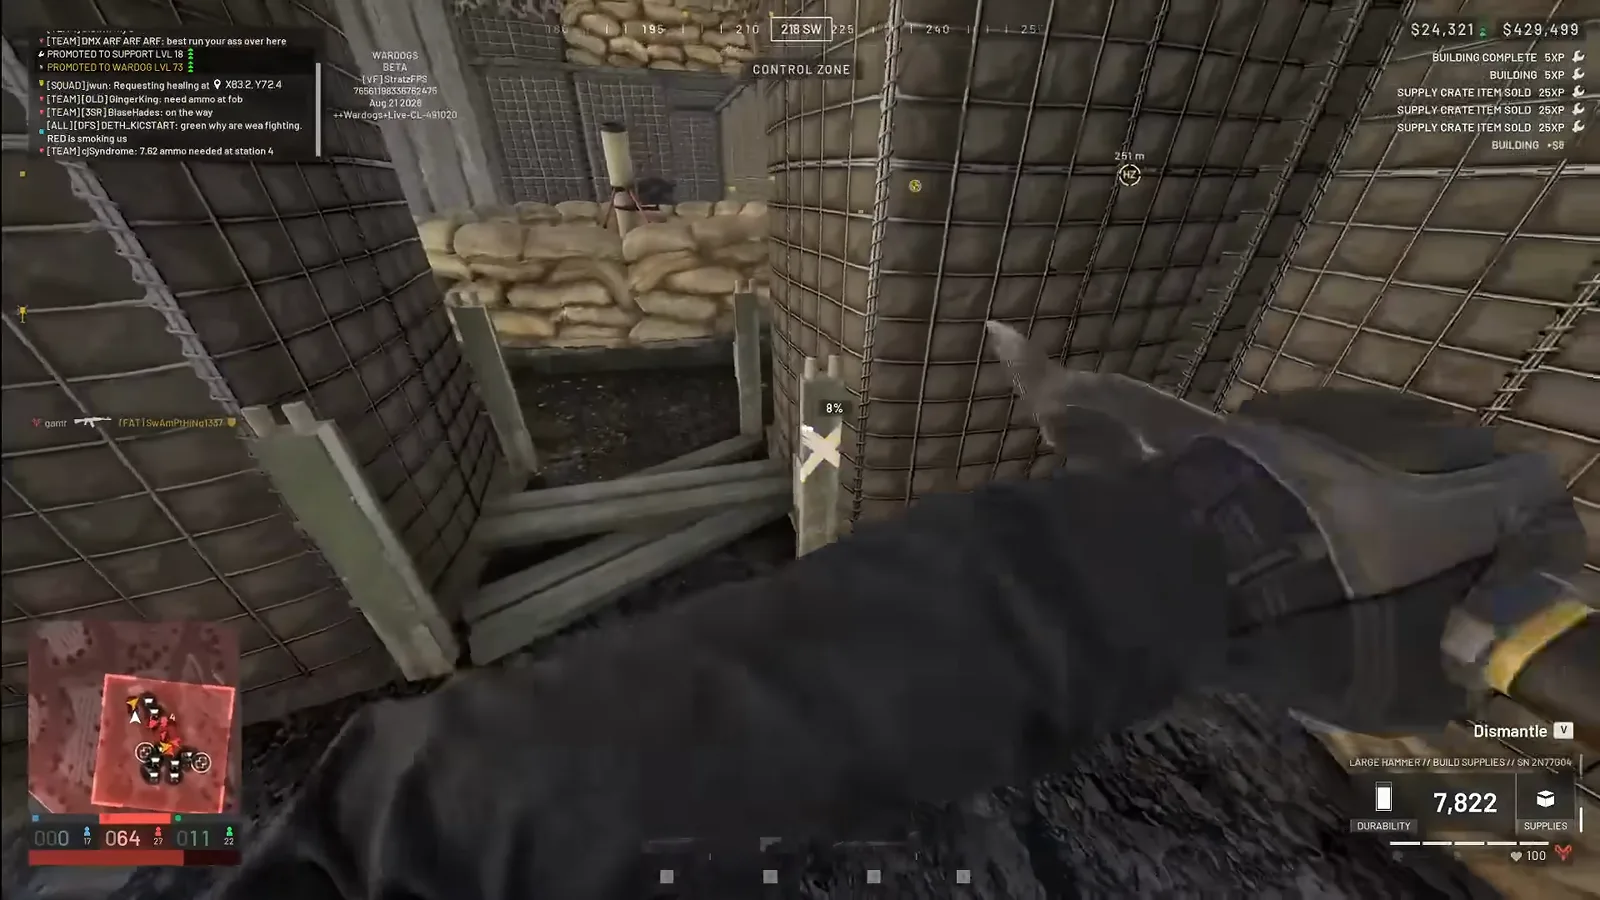 Step 1 (0:22) — Build progress pays 5 XP per completed object and supply-crate sales pay 25 XP, so the boring base-building phase is quietly leveling support for you.
Watch the FOB build phase (0:22)
Step 2: Place the Launch Tube at the Edge of Your Position
Put the tube down where you have room and sightline, not in the middle of the motor pool. The placement moment is the one the video shows plainly: you carry the tube out, the CAUTION marker hangs over the muzzle, and the tablet and map are both open at your side while the game confirms the unlock.
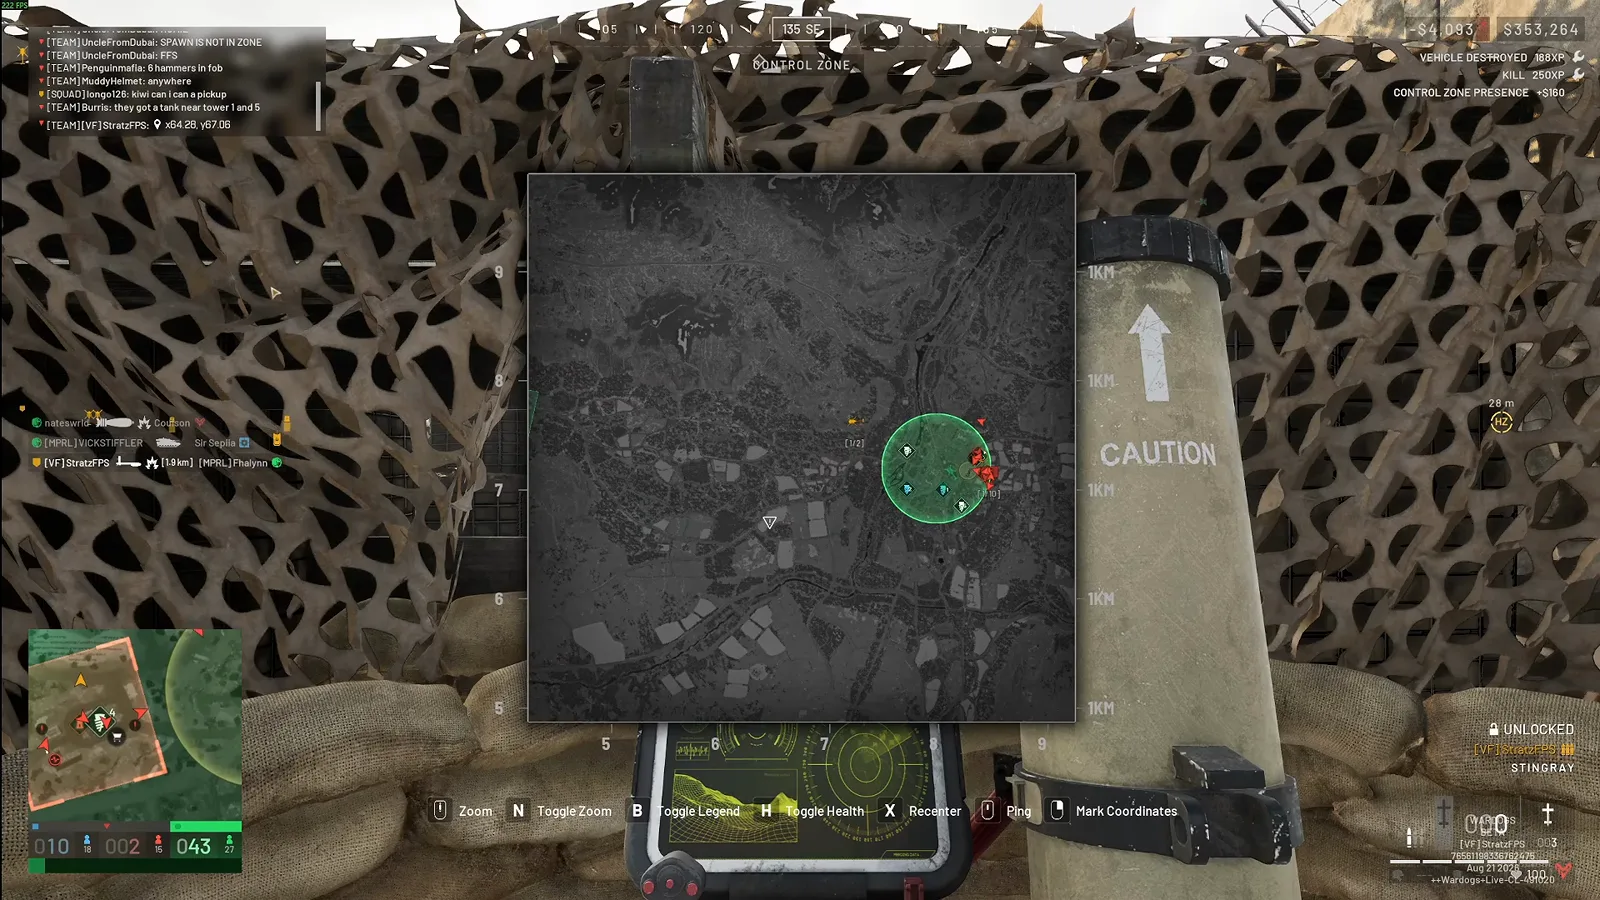 Step 2 (5:22) — Once the tube is down it is a target: mortars will walk onto it, so treat placement as a firing-position decision, not a decoration decision.
Watch the launcher placement (5:22)
Step 3: Read the Real Price of a Sortie
Open the launcher panel and the arithmetic is printed for you: SPARE PARTS 1,900 in stock, 900 burned per drone, $5,000 in cash, and a PURCHASE STINGRAY button under a one-line description — “A remote-controlled, long-range UAV designed to destroy armored vehicles. Operates on limited battery power.”
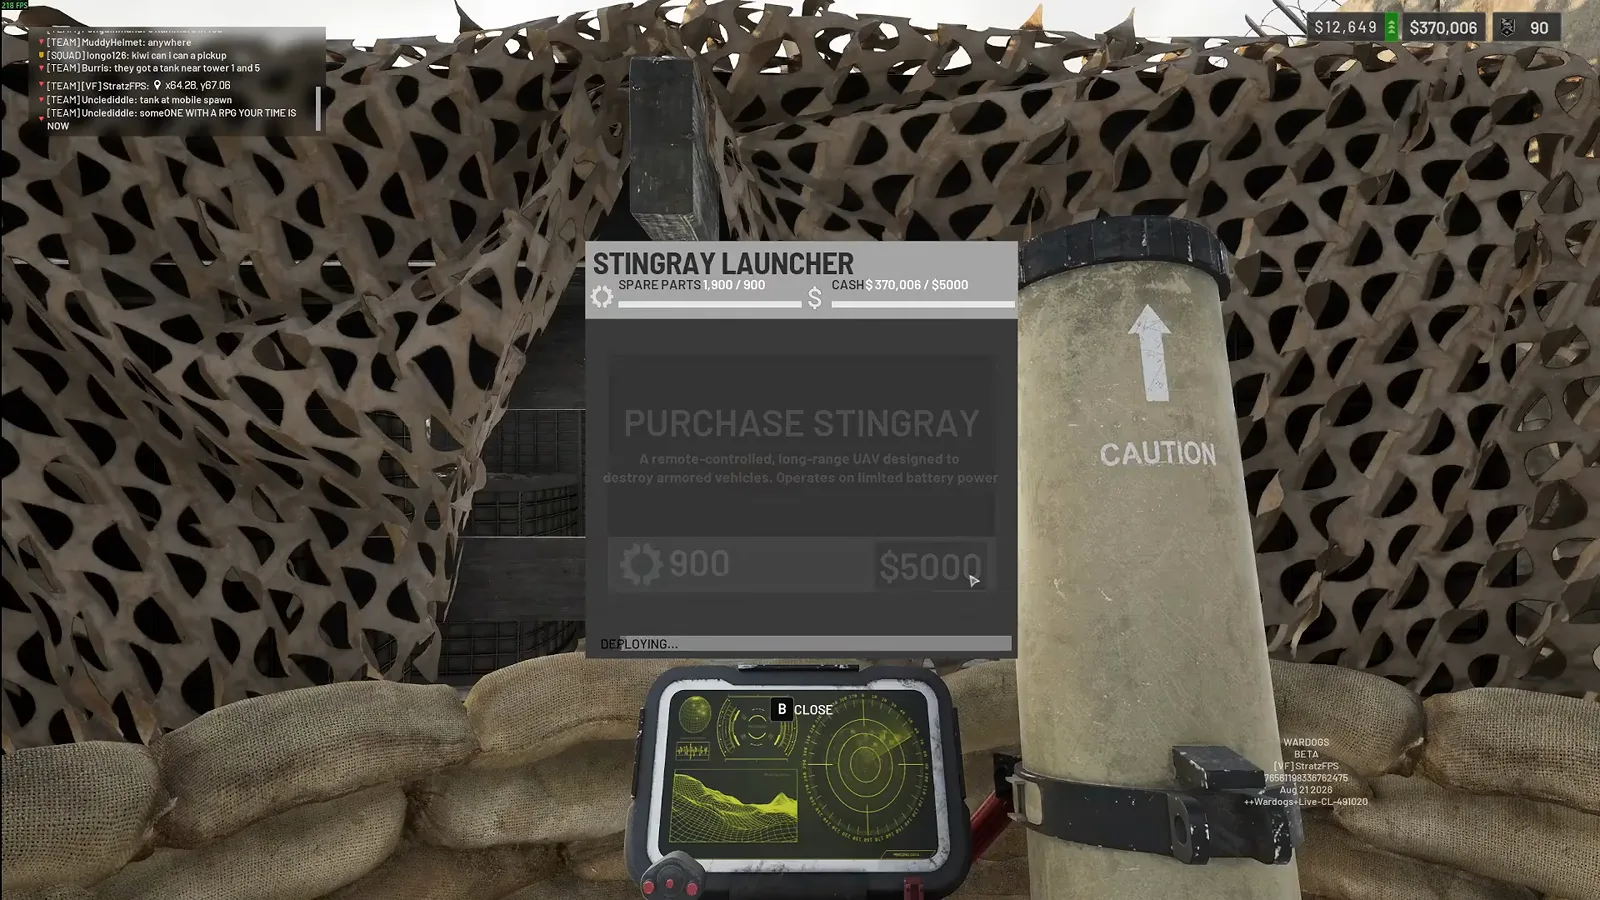 Step 3 (7:10) — That stockpile is one and a half sorties deep. This is the balance mechanic: the drone is cheap per kill and ruinously cheap per miss.
Why the drone belongs at a second FOB, not the main one
The narrator’s strongest tactical advice is a basing one: set the launcher up at main base at the start of the round, then move the drone operation to a separate FOB once enemy mortars and artillery start ranges onto your tower or main position. While you relocate, put down your own mechanical pallet so you are not waiting on a convoy to launch again. A drone station that depends on someone else’s truck is a station with a $5,000-per-attempt downtime problem. The pallet mechanics — buy, load, drive, G to drop, hold F to unload — are step-by-step in our logistics guide, and the base you are hiding behind is in the FOB building guide.
Watch the cost breakdown (7:10)
Step 4: Aim the Tube the Wrong Way On Purpose
Counter-intuitive, and it is the single biggest handling win available. The drone is thrown almost straight up out of the tube and comes over the top fast, so if the launcher is already pointed at your target you arrive with too much speed and no turn authority — the video describes it as “shooting you straight up into the air super, super high”. Point the tube opposite the target instead, and you get the room to turn the thing around and set the run-up properly.
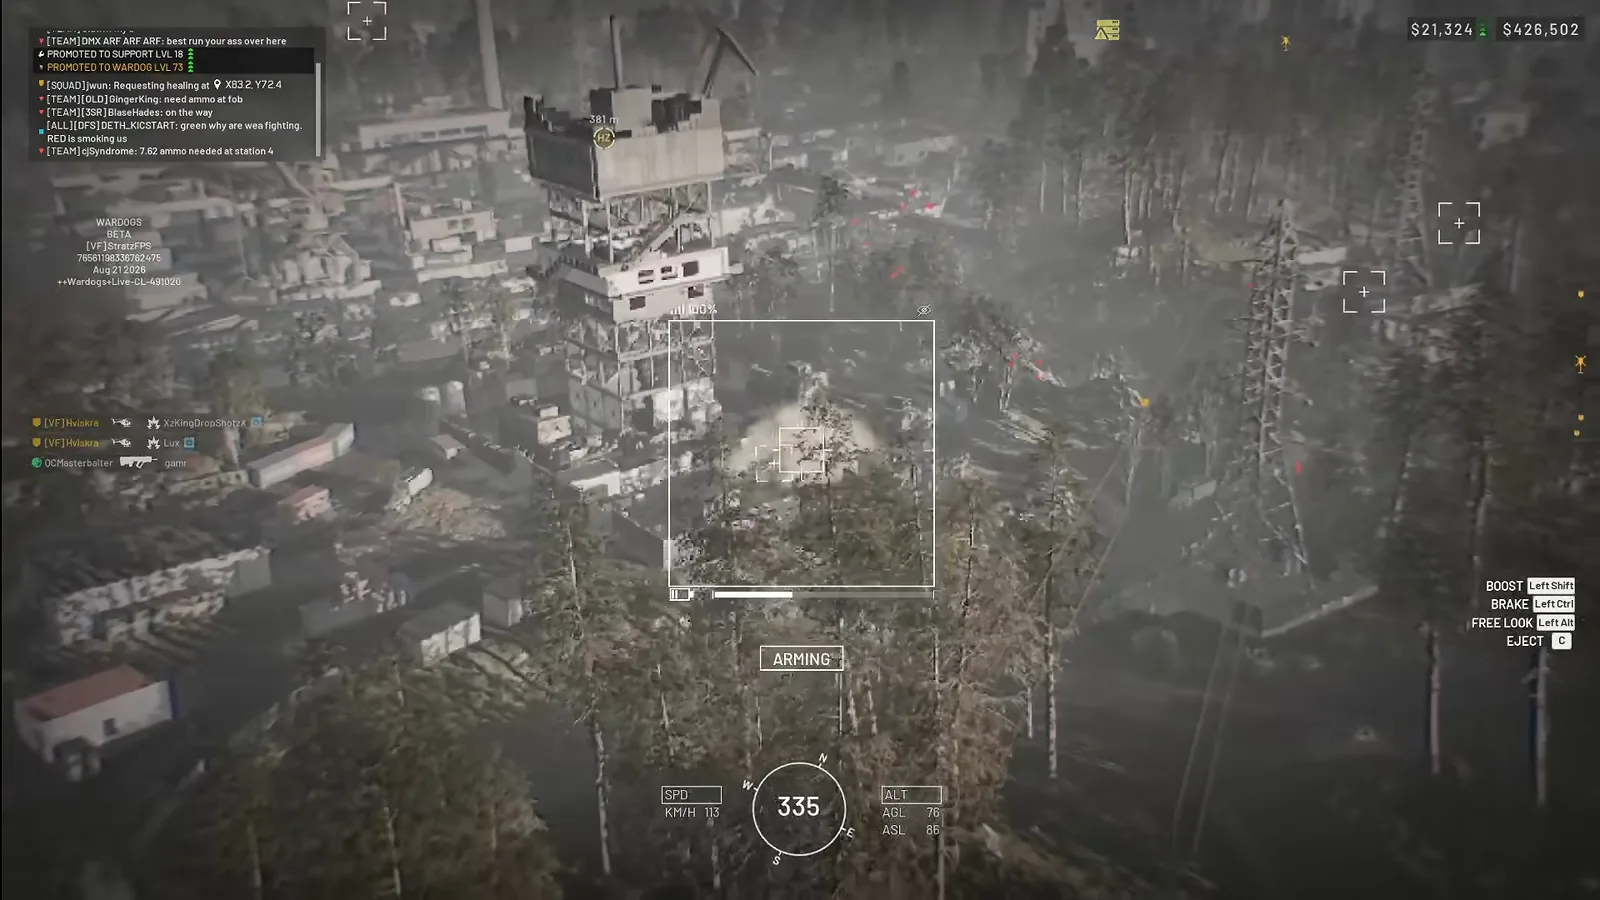 Step 4 (3:02) — Memorise this strip:
 Left Shift boost, Left Ctrl brake, Left Alt free look, C eject. Both speed inputs are on the left-hand modifiers, which is how you end up holding both at once by accident.
Watch the launch and climb (3:02)
Step 5: Fly It Like an Aircraft, Not Like a Quad
The FPV HUD is minimal: state word (ARMING → ARMED → HOLD), airspeed in km/h, AGL and ASL altitude, heading tape, battery percentage, and a red lock box when a vehicle is in the reticle. What is missing is the important part — there is no roll. You get yaw and pitch, which produces a very large turn radius. The remedy is Left Ctrl to scrub speed and sharpen the corner, and that spends battery you cannot get back, so the flight is a budget: find the target, line it up, commit.
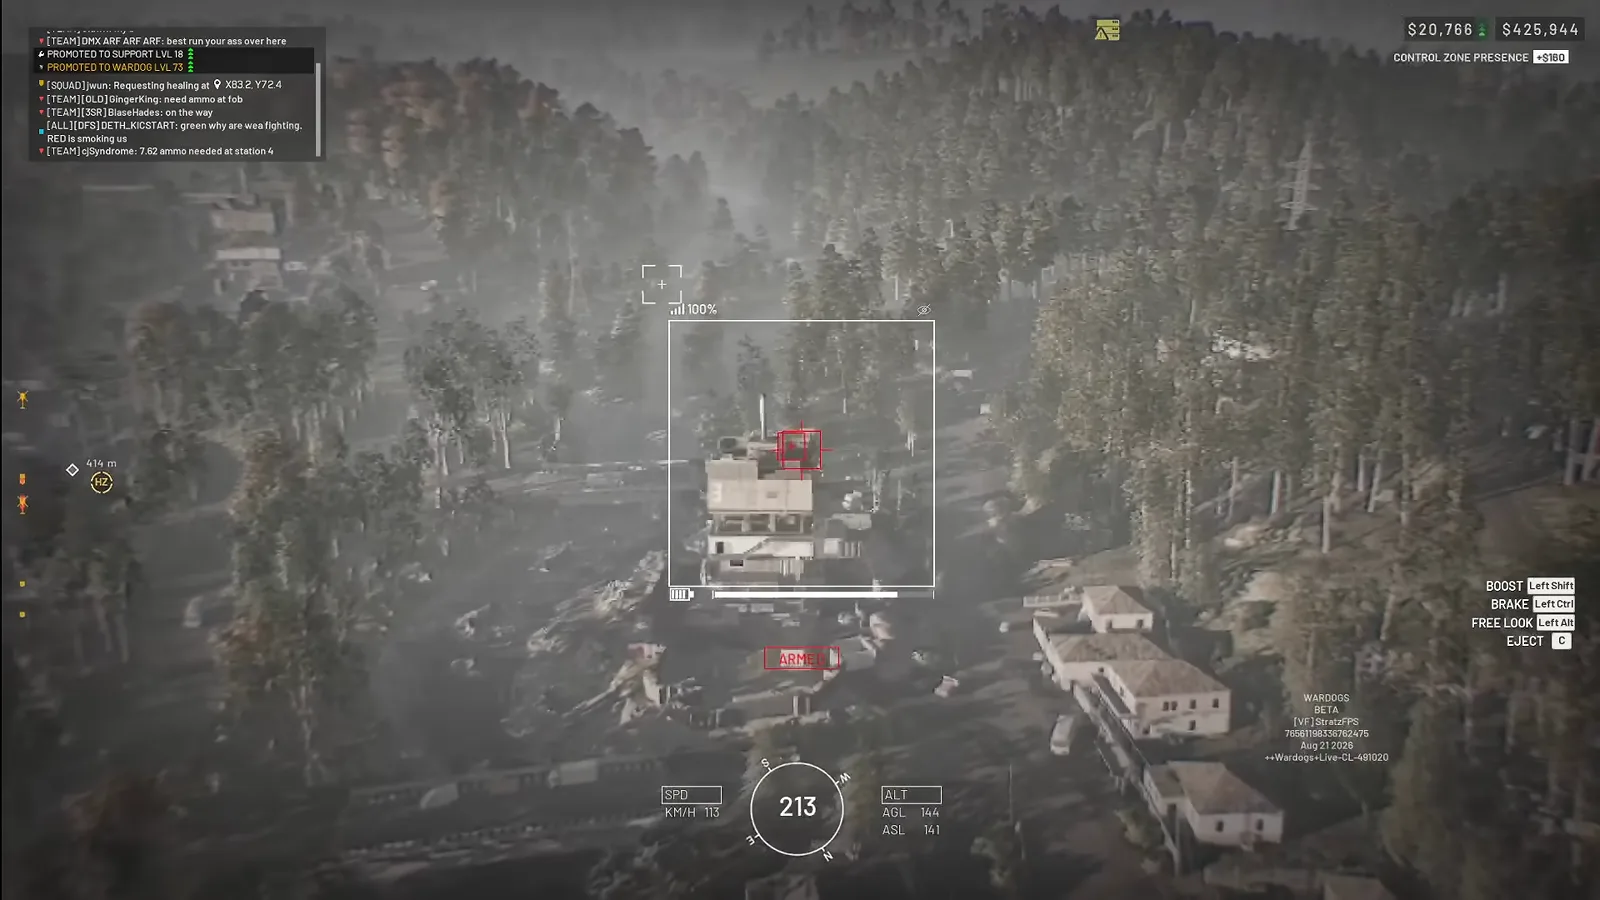 Step 5 (1:42) — Lock is not kill. That red frame means a vehicle is in the solution; you still have to arrive with the nose on it.
Watch the flight handling (1:42)
Step 6: Use the Cheap Ones as Recon Before You Spend Them as Ammo
The same flight that costs $5,000 is a free intelligence package, and the video uses it that way — flying a treeline and calling out everything below. In one pass the narrator spots Kodiaks, four-wheelers and supply trucks and relays them to the gunship and mortar crews; a chat message reading “tank at mobile spawn” is the payoff, and it took no ammunition at all.
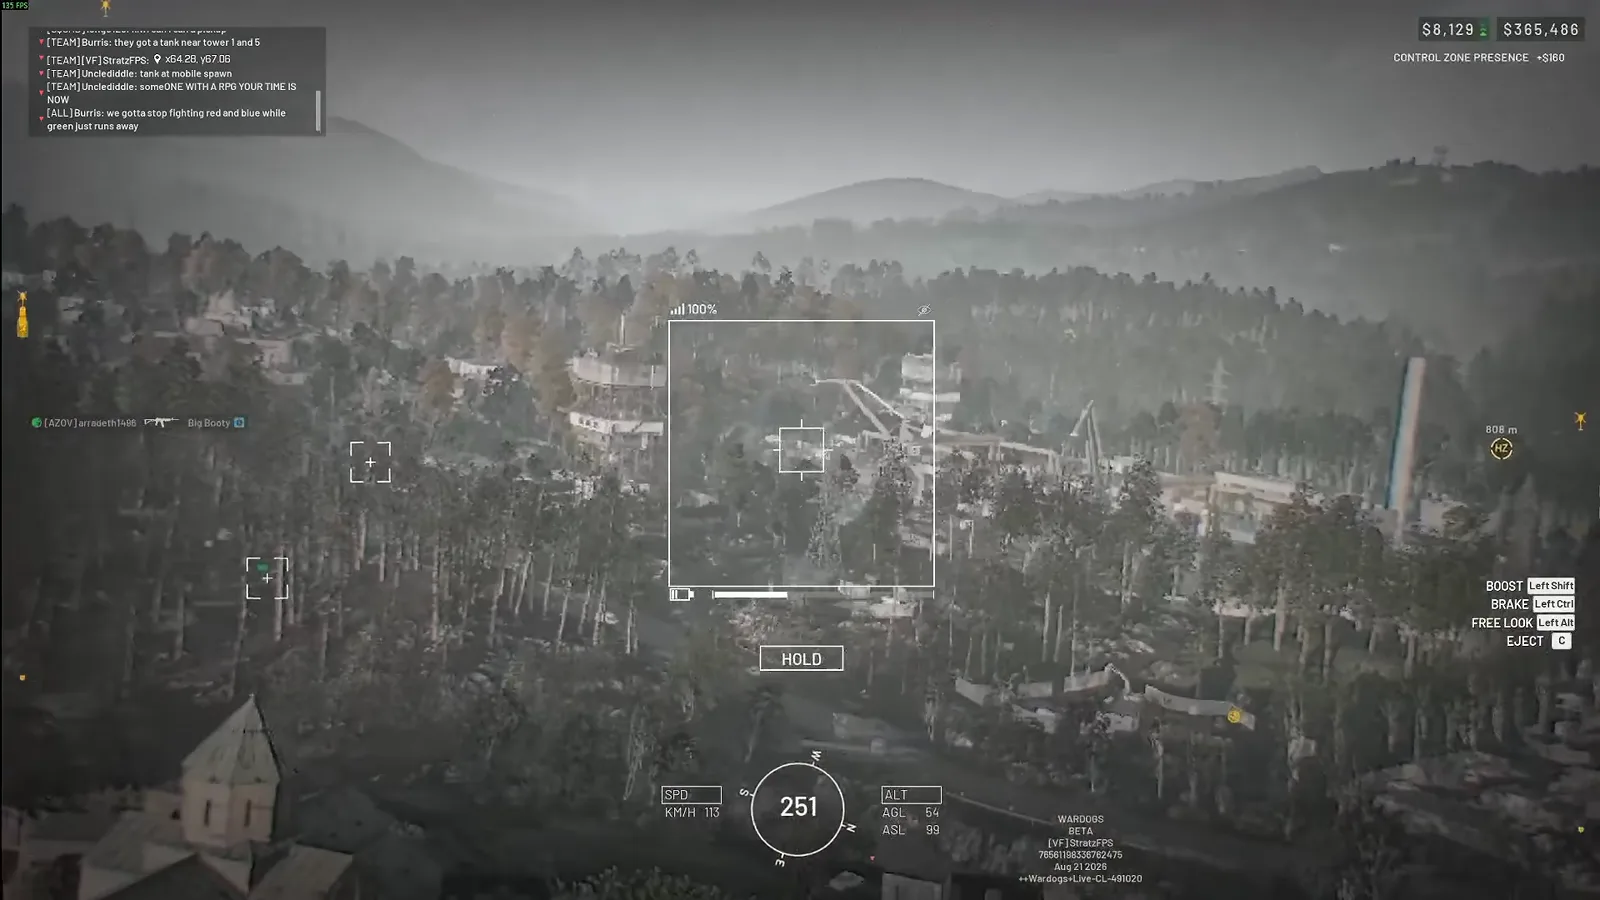 Step 6 (8:22) — If you are not certain the target is worth a drone, fly the pass first. Marking it for a rocket helicopter costs nothing; missing with a drone costs $5,000.
Step 7: Terminal Dive — Line It Up Early, Then Stop Fighting It
The kill itself is the ugly part: late inputs make the nose wander, and a drone that misses a stationary tank is pure loss. The demonstrated solution is patience plus terrain — the narrator threads a drone through tree branches to reach a marked tank rather than flying the clean line, because the lock was already set and the run-up needed the extra seconds. Two red lock frames can be held at once when vehicles sit close together; pick the one that is doing you the most damage.
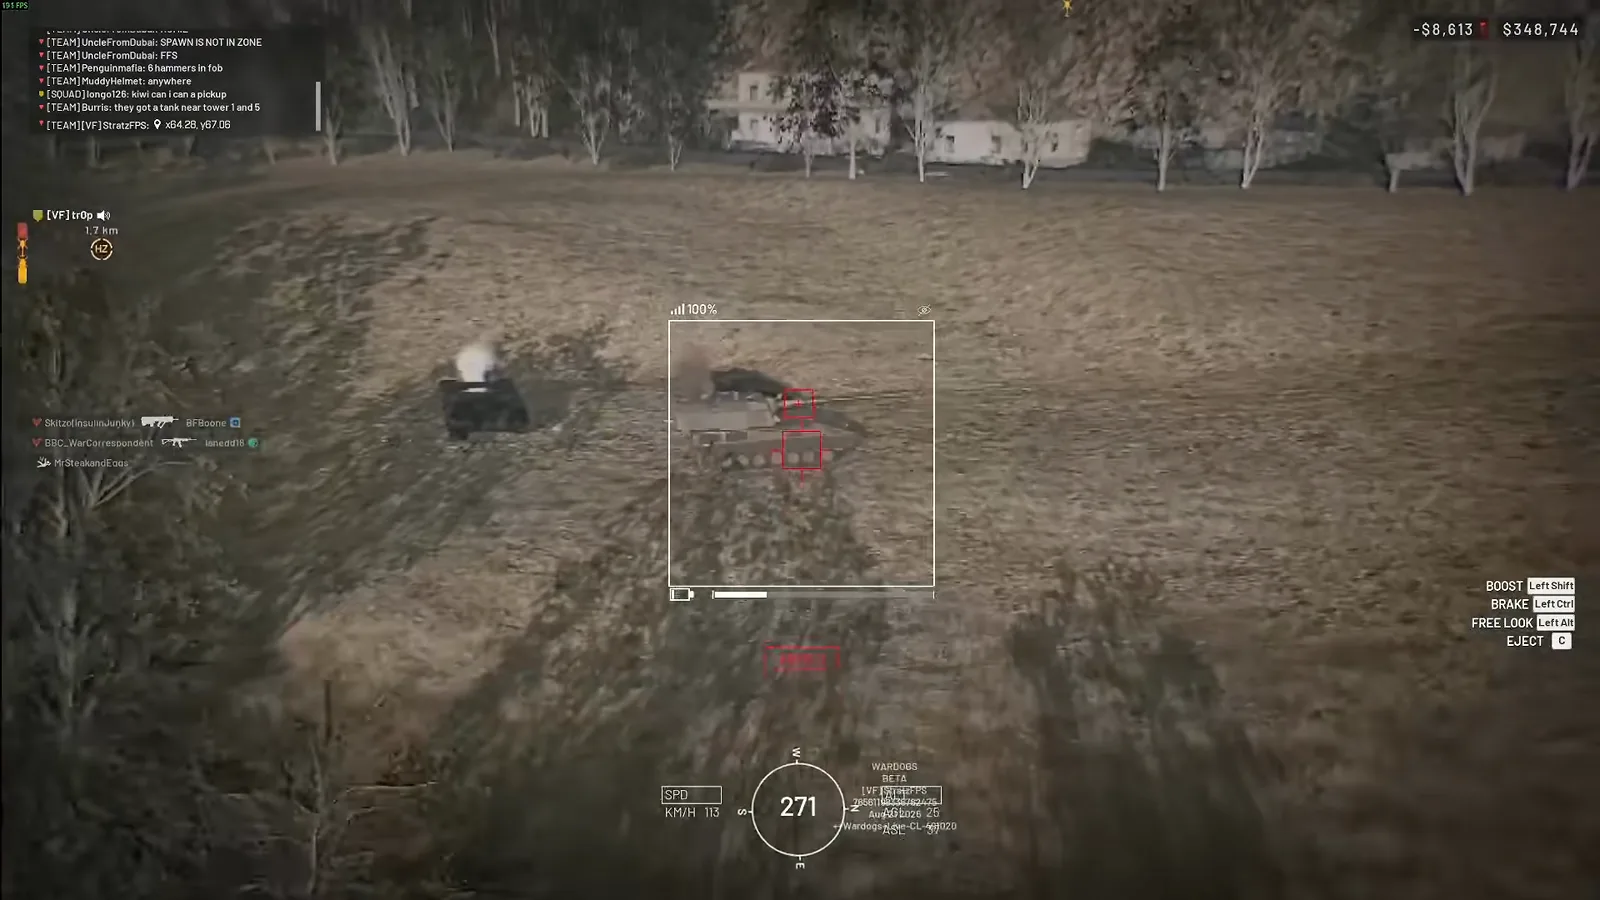 Step 7 (7:00) — Best targets in the video’s own order: enemy artillery tanks, mobile ground tanks, and the parked spawn carrier whose loss forces the whole enemy team back onto helicopters and transports.
Watch the dive and impact (7:00)
Step 8: Bank the Kill and Accept the Black Screen
Impact ends the drone: SIGNAL LOST… PLEASE STAND BY scrolls across the panel while the reward ticker prints +$14,000 next to a VEHICLE DESTROYED banner. That is the trade the whole system is built around — one destroyed vehicle, one $14,000 beta payout, one 900-spare-parts hole in your FOB stockpile that only a supply truck can refill.
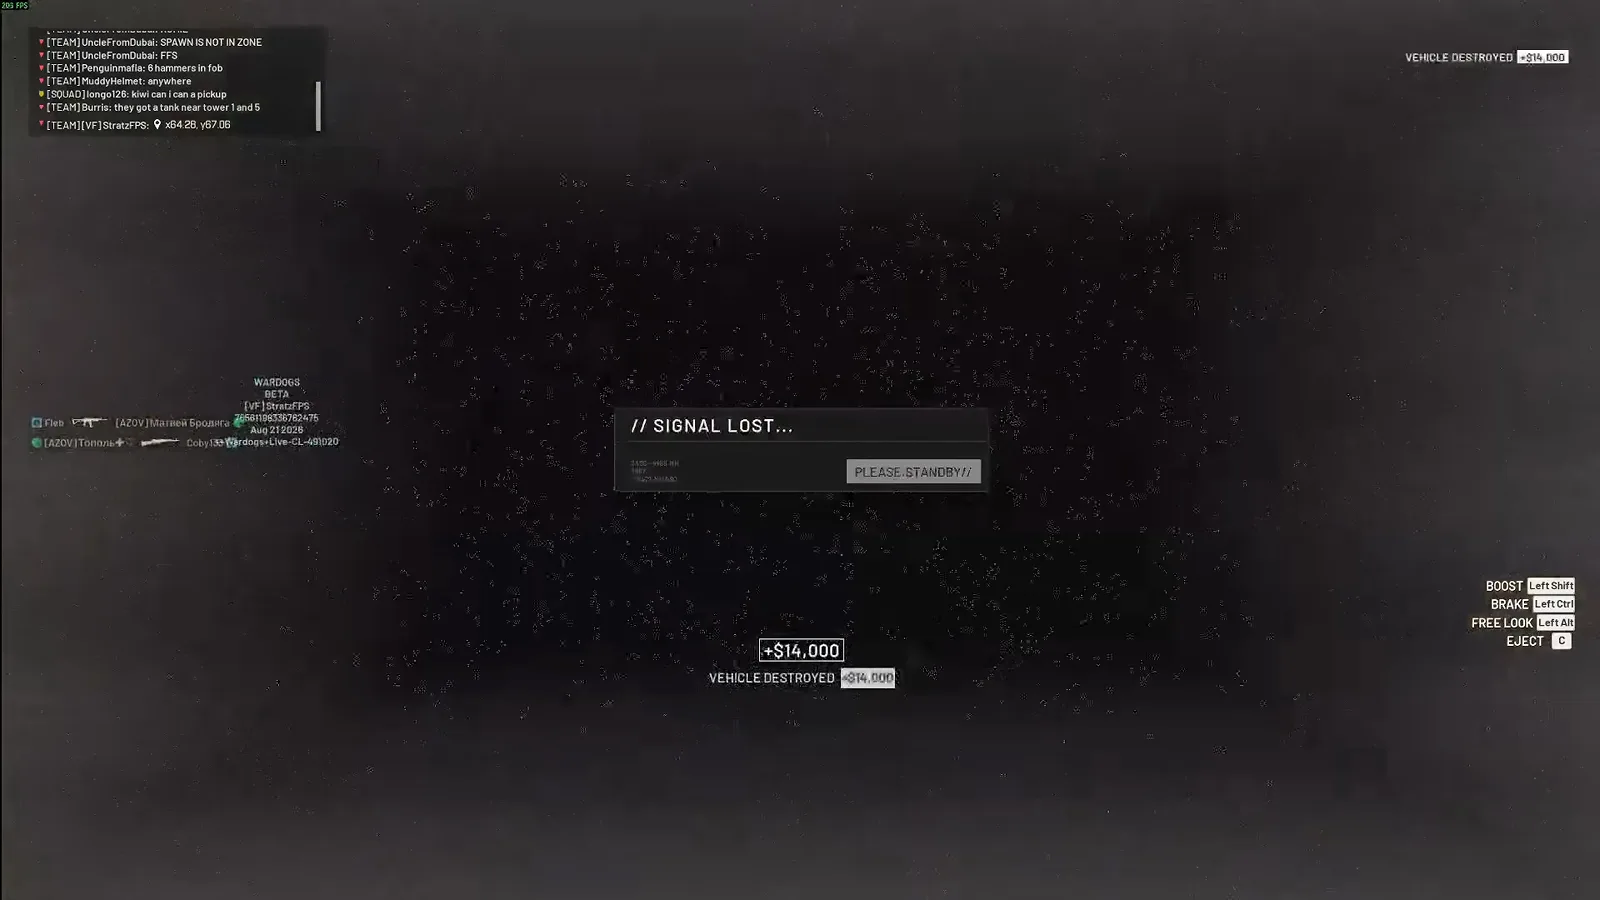 Step 8 (7:04) — Reload time is convoy time. Measure your drone station by how often a mechanical pallet actually arrives, not by how many you can afford.
Watch the kill confirmation (7:04)
Stingray Rules of Thumb
- One-shot is the selling point, one-way is the price — the video reports the drone killing armour almost every time it connects, where the same player needed roughly three RPG rounds inside one battle tank. Compare that against the $30,000 RPG-7 ladder in our XP and unlock leveling guide.
- Stockpile first, launch second — 900 spare parts a flight off a 1,900 pile means two sorties. Keep the pallets coming per our logistics guide or the station is decoration.
- Launch away from the target — the vertical throw gives you altitude and speed you cannot bleed off, and the drone cannot roll to fix a bad line.
- Brake is battery — sharpen the turn only when the lock is already worth the flight time left on the gauge.
- Prefer parked, high-value prey — spawn carriers and artillery tanks sitting on a tower are the video’s own best kills; a three-artillery-tank wipe in about two minutes is the argument for a second drone FOB. The ground alternatives are in our anti-tank guide and the counter-battery maths in our artillery walkthrough.
- Mark what you do not spend — recon passes feed the gunship and the mortars, and the grid calls are how our maps and tactics guide turns a spot into a kill.
Reconstructed frame-by-frame from StratzFPS’ beta Stingray footage; every price on this page is a beta number and the drone’s availability in Early Access was still unconfirmed when the source was recorded. For the truck side of the supply loop that arms this thing, see the logistics guide; for the tracked and wheeled armour it kills, the vehicles guide.
Related Articles
guides
WARDOGS Logistics Guide: Supply Pallets, Crates and FOB Deliveries
A frame-checked WARDOGS logistics guide: open the B menu, load pallets and crates, check what a FOB is short on, drive to the contested zone and unload.
guides
WARDOGS Season 1 Patch Notes: Every XP, Price and Unlock Change
Full WARDOGS Season 1 changelog, dated and sorted: XP bands 40-124% slower, FOB raised to $7,500, Artillery to Career 90, plus the 0.11 server-browser patch.
guides
WARDOGS How to Level Up Fast: XP Curve, Class Unlocks and Shortcuts
A frame-checked WARDOGS leveling guide: read the six-class XP curve, hit the cheap early levels first, and unlock the AK74, SKS, RPG-7 and Ural faster.
Was this helpful?
Thanks for the feedback!