WARDOGS Ammo Guide: Loose Rounds, Resupply and Ammo Types
WARDOGS ammo guide: loose rounds versus magazines, combining ammo on C, resupplying at the Kodiak or FOB, and what FMJ, HP and AP really do to armor.
FAQ
How do you get more ammo in WARDOGS?
Does ammo type matter in WARDOGS?
What is the difference between loose ammo and magazines in WARDOGS?
How much does ammo cost in WARDOGS?
Should I buy AP ammo in WARDOGS?
Ammo is the one WARDOGS resource every player runs out of and almost nobody explains. Not cash, not fuel, not build supplies — the moment your magazine clicks empty, three separate systems decide whether you live: whether you are carrying loose rounds or loaded magazines, which of the three round types you paid for, and whether anyone has restocked the FOB you are standing behind.
The confusing part is that the game never joins these up. The vendor sells you a magazine and a box of rounds as two different products, your reload key only reaches for the first one, and the round descriptions promise “increased damage against body armor” without telling you how much you give up somewhere else to get it.
This illustrated guide separates the two questions — how do I get more ammo and which ammo is worth the money — using frame-checked vendor screens for the mechanics and three independent firing-range test sessions for the damage numbers.
Source and Verification Card
| Field | Detail |
|---|---|
| Systems | Loose rounds vs magazines · combine-ammo · FOB resupply · round types |
| Round types | STANDARD (FMJ) · FLESH DAMAGE (HP) · ARMOR PIERCING (AP) |
| Core keys | B buy ammo/supplies · C combine ammo · Ctrl + Left Click push rounds to a mag |
| Screenshots from | StratzFPS (equipment vendor, closed beta build Aug 21 2026) · Quick Tips (Garage Vendor, launch build) |
| Damage figures from | NellyJai · SirSmoken · Fringe-Patriot Gaming · StratzFPS · StingKnight · Ape Knight Gaming · Mattzila 999 |
| Not covered here | Moving pallets between FOB and front — see the logistics guide |

StratzFPS — Does Ammo Type in WARDOGS Actually Matter? (firing-range test)
The vendor screenshots come from StratzFPS’s closed-beta ammo session and Quick Tips’s launch-week supplies walkthrough. The damage tables are cross-checked across four separate testers, and the loose-ammo and combine-ammo keybinds come from Ape Knight Gaming and StingKnight. Those last two channels are credited for their explanations only — their footage carries a streamer camera box and burned-in captions, so no frame from either appears on this page.
Step 1: Learn That You Are Carrying Two Different Products
The vendor sells ammunition and magazines as separate items, and the difference is the whole reason you can be standing there with 160 rounds in your bag and a gun that will not fire. A magazine is a container: the MP5 30 Rnd Magazine card lists 30 Rounds, 9x19mm ammo, MP5 only, a 0.5 kg weight, and a CONTAINS line naming exactly what is loaded inside it. Loose ammo is rounds with no container — reserve weight that has to be pushed into a magazine before it becomes something you can shoot.
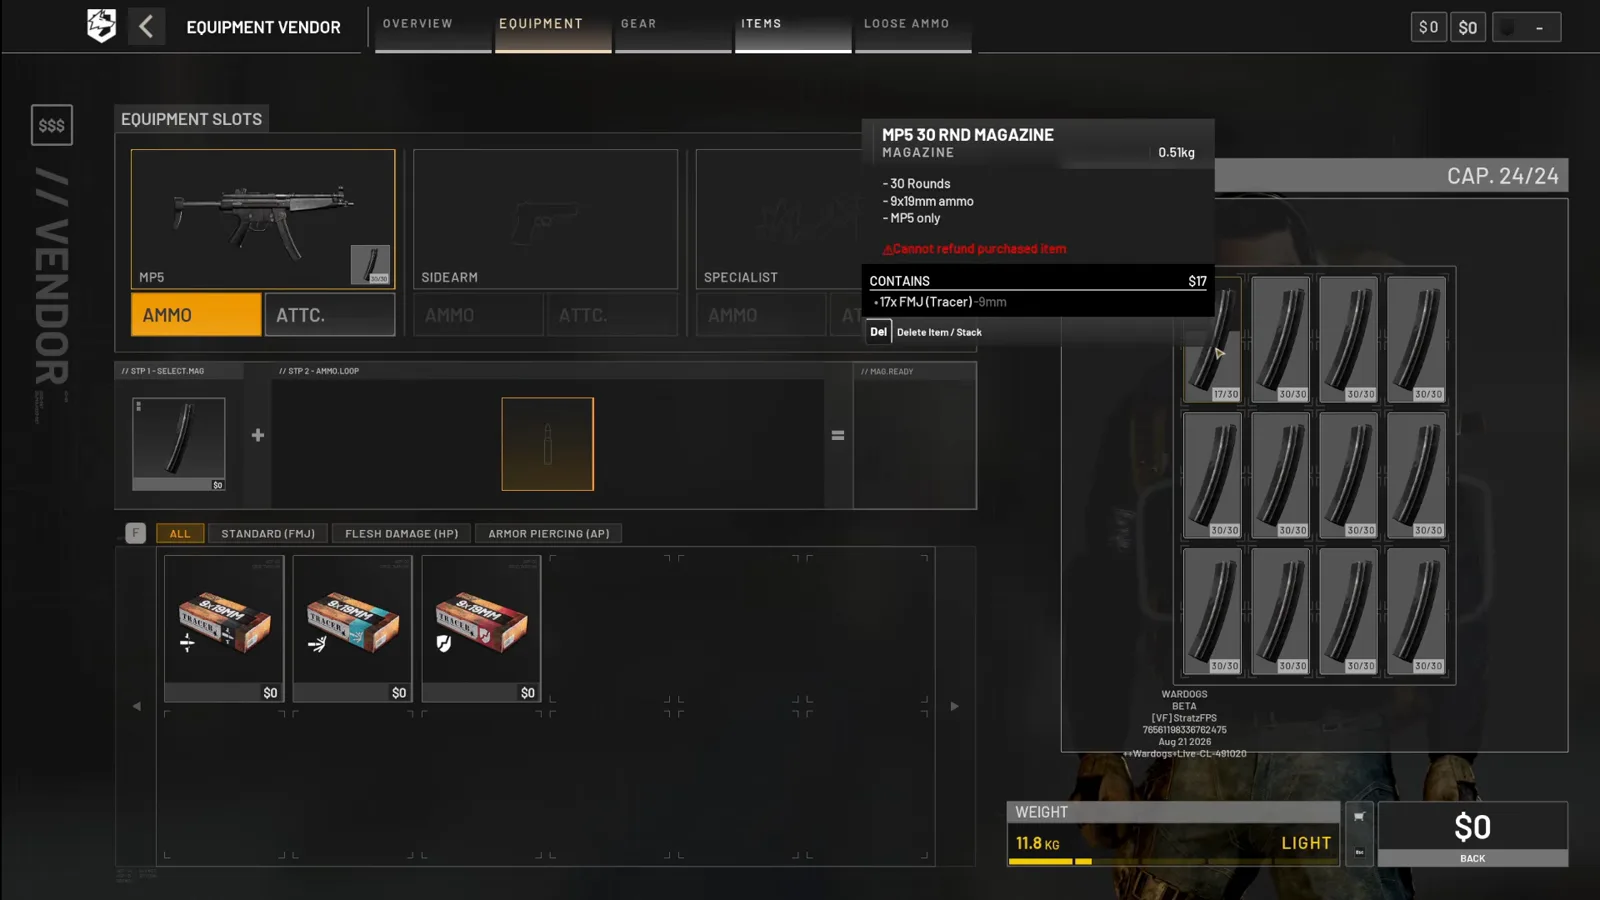 Step 1 (Timestamp: 00:42) — Read the CONTAINS line before you buy another box. Seventeen of thirty slots already filled means the magazine is half-spent, not broken, and one combine action fixes it.
The same tooltip settles the tracer question the search results keep asking: the round name carries a parenthetical flag — FMJ (Tracer) — so tracer is a loadout marking on a standard round, not a fourth damage category. And no high-explosive small-arms round exists in the infantry vendor in any footage we checked; HE is a vehicle-gun shell class, which belongs to the tank guide and the artillery walkthrough.
Watch the magazine card (00:42)
Step 2: Fill The Magazine In The Vendor Before You Deploy
Inside EQUIPMENT VENDOR → EQUIPMENT, each weapon slot (Primary, Sidearm, Specialist) has its own AMMO and ATTc. buttons. Hit AMMO and the screen becomes a two-step assembler: // STP 1 – SELECT MAG on the left, // STP 2 – AMMO LOOP in the middle, and // MAG READY on the right. Put a magazine in the first slot, an ammo box in the second, and the result is a magazine whose card reads Loaded: 30x Standard (FMJ).
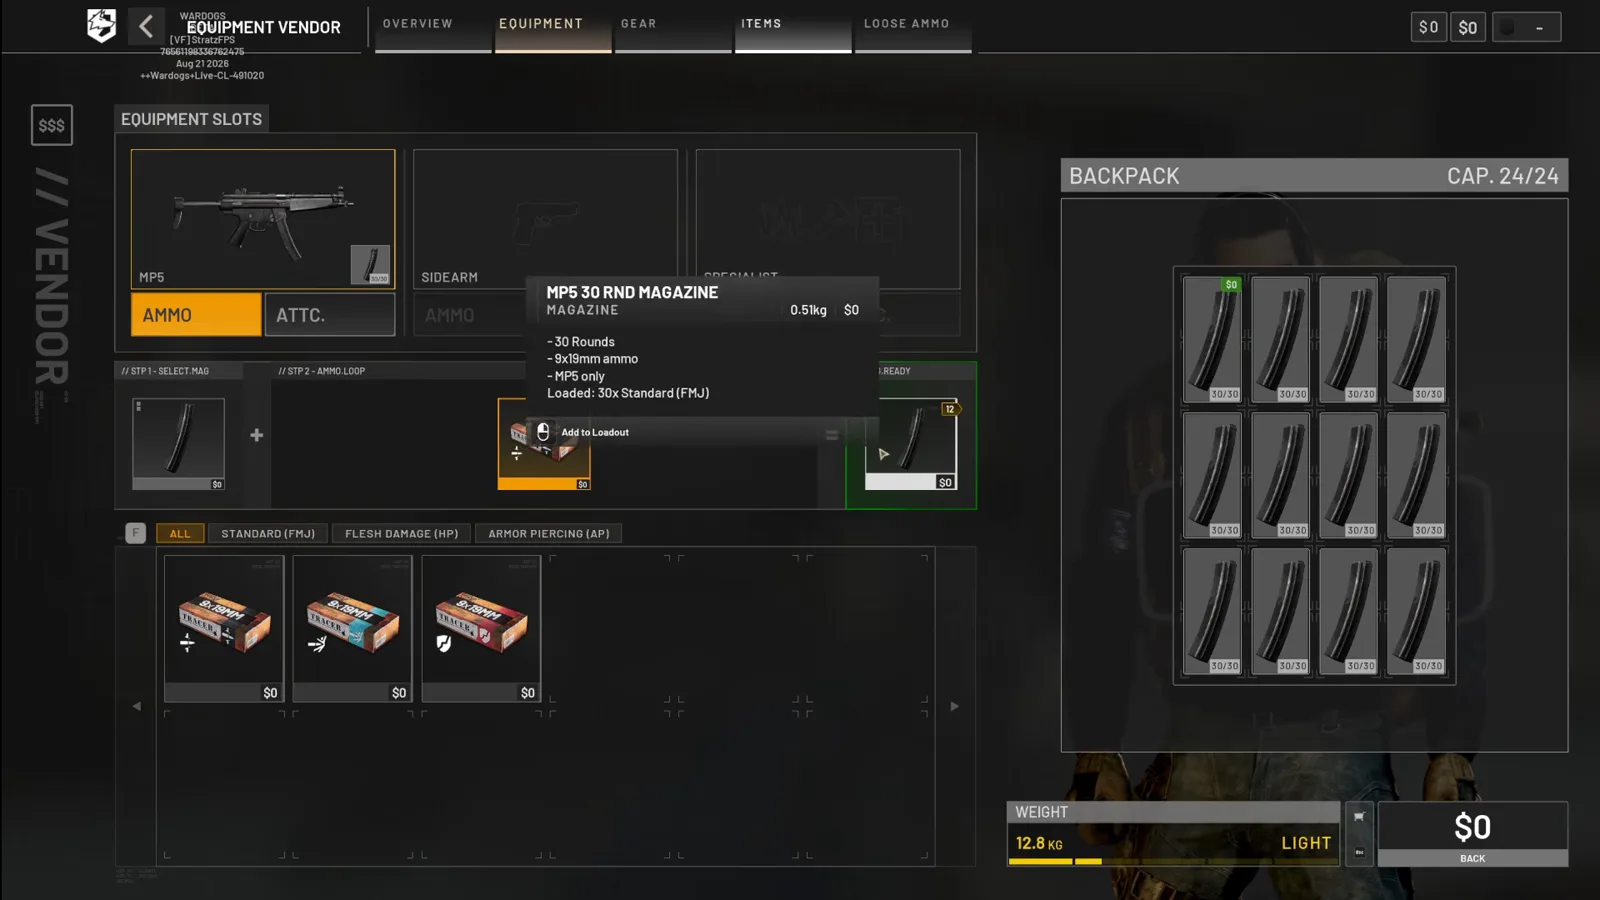 Step 2 (Timestamp: 00:56) — The green tile is the confirmation: an empty magazine plus an ammo box equals a loaded one. Do this before you spawn and the field problem mostly disappears.
The row of boxes under the loader is filtered by chips — ALL / STANDARD (FMJ) / FLESH DAMAGE (HP) / ARMOR PIERCING (AP) — which is where you choose your round type per caliber. There is also a top-level LOOSE AMMO tab in the vendor bar for buying rounds without a container.
Watch the loader and chips (00:56)
Step 3: Combine Loose Ammo In The Field With C
This is the step that catches everybody, and it is the single most-asked question in the community: when your magazine is empty, reloading does not pull from your loose ammo. Ape Knight Gaming demonstrates the fix exactly — open your inventory, hold left click and drag the magazine out into the bag, then press C, and the game transfers loose rounds into that magazine. Reattach it and you are back in the fight.
Two refinements matter more than the base trick:
Ctrl+ Left Click pushes extra loose rounds straight into a magazine sitting in your backpack, so you can pre-load the spare while you still have a moment.- Do not start this mid-fight. Combining is slow and it leaves you holding nothing. The testers’ consensus is that the reload-from-loose animation is a death sentence; combine behind cover, or between contacts.
Watch the combine-ammo action (00:20)
Step 4: FMJ — The Default, And Still The Best Day-One Round
The vendor’s own card for the 9 mm box is the cleanest summary of what standard ammunition does: ”- Standard ammunition / - Deals even damage to all target types.” No bonus, no penalty. That flat profile is why three of our four testers land on FMJ as the round you buy without thinking.
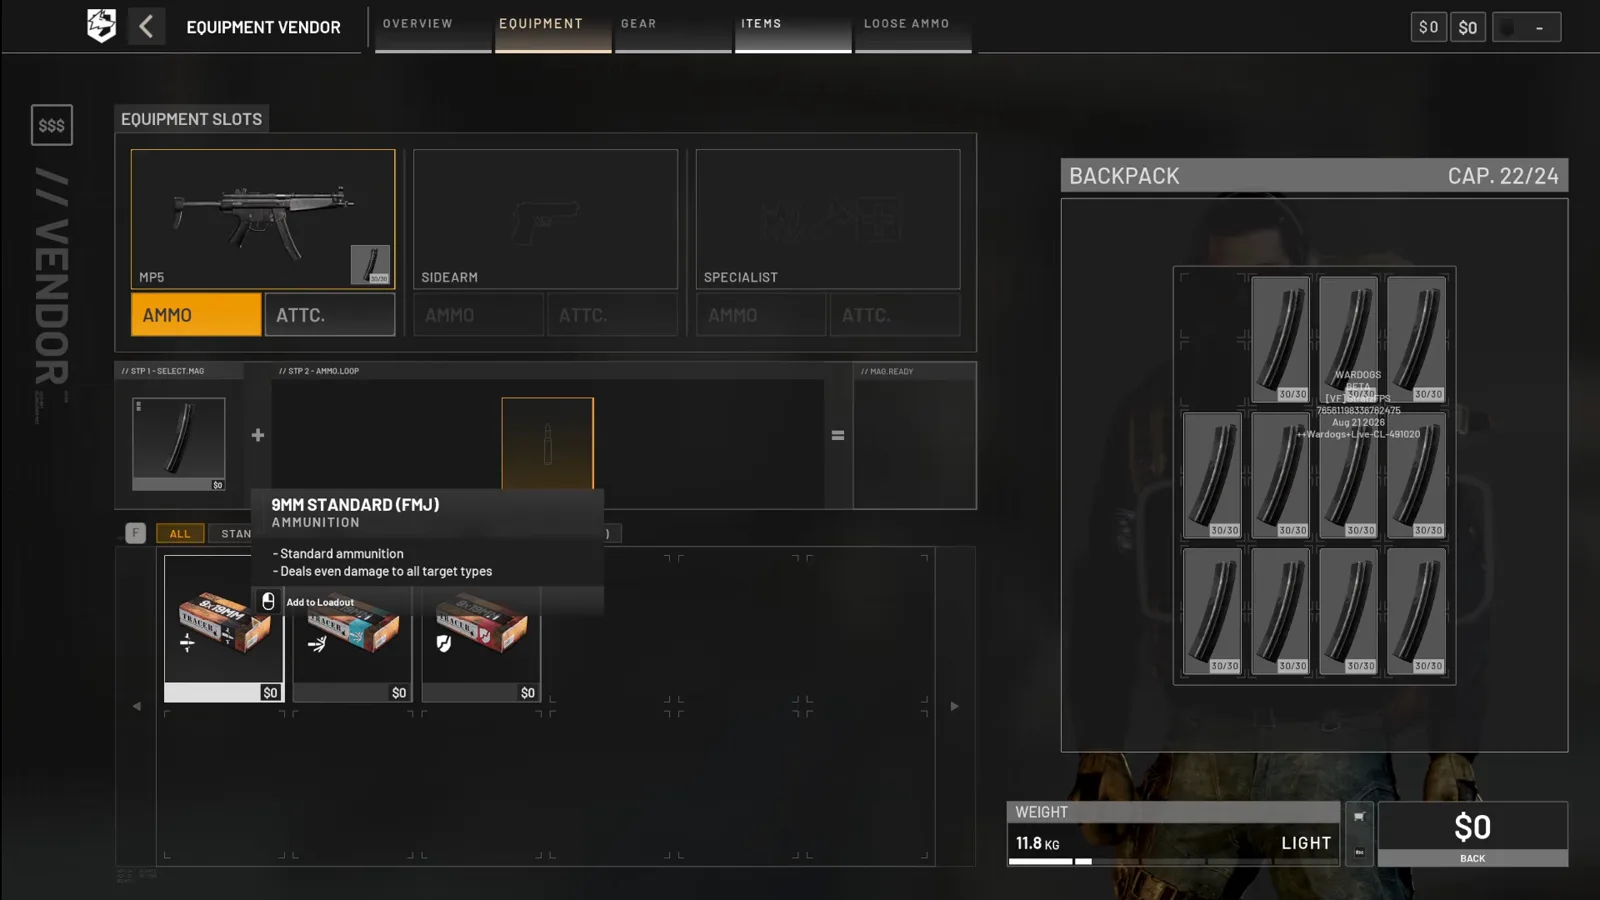 Step 4 (Timestamp: 00:48) — “Even damage to all target types” is the honest label. FMJ never gets punished, which is worth more in a mixed fight than a situational bonus.
The catch is that “even” means unremarkable. Against tier three and tier four armor FMJ loses to AP, and against bare flesh it loses badly to HP. It simply never loses so hard that a specific enemy type becomes a wall.
Step 5: HP (Flesh Damage) — Double Damage, Or Almost Nothing
The HP card reads ”- Increased damage against flesh. / - Decreased damage against armored targets.” Both halves are real, and the gap between them is the widest swing in the game. NellyJai’s model puts HP at 2.0x FMJ base damage; SirSmoken’s range measurements put the consequence at roughly double FMJ on exposed limbs — a lower-arm shot at about 14 with FMJ versus about 29 with HP, an upper-leg shot at 17 versus 34 — and near-zero the moment the round hits plate.
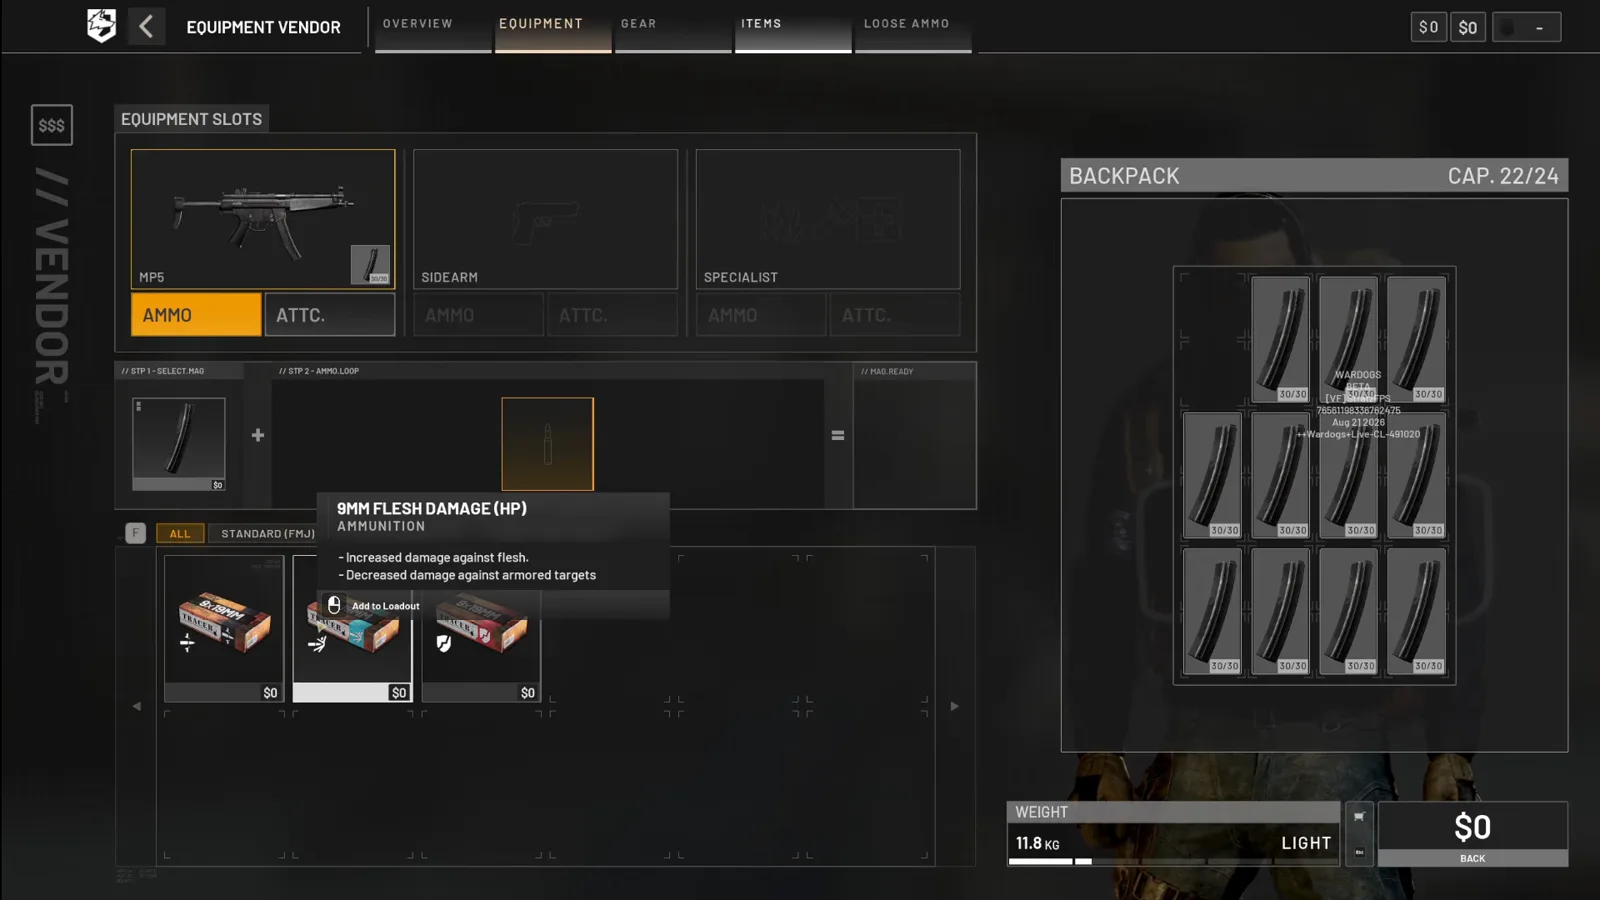 Step 5 (Timestamp: 00:50) — The card is not exaggerating. HP is the highest-damage round in the game against a target that cannot see it coming, and the worst round in the game against a target in good plate.
The reported armor penalties are brutal: NellyJai measures armor reducing HP by 90%, 93%, 97% and 99% at tiers one through four. SirSmoken lands in the same place — about 2 damage to a tier three body, under half a point at tier four — and StratzFPS records a single 0.35 hit against level four armor. Against unarmored targets, the same testers found HP best in the game, and NellyJai’s time-to-kill table puts HP rounds on the top three guns for limb shooting.
Why the hitbox matters more than the round
SirSmoken’s testing found a separate neck hitbox where HP lands around 69 damage at tier one and two — then collapses to plain body damage at tier three and four. He also reports that tier four armor removes the pelvis and upper-arm hitboxes entirely, treating them as body. So the more armor your target buys, the fewer places exist where HP’s doubled damage can actually apply. Add that a moving player behind cover rarely exposes a leg, and the honest read is: HP is a deliberate, disciplined loadout choice, not a damage upgrade.
Step 6: AP (Armor Piercing) — Worth It Later, Not On Day One
The AP card reads ”- Increased damage to body armor and vehicles / - Decreased damage to unarmored body parts.” That second line is the one players skip, and it is the reason the round is more contested than the label implies.
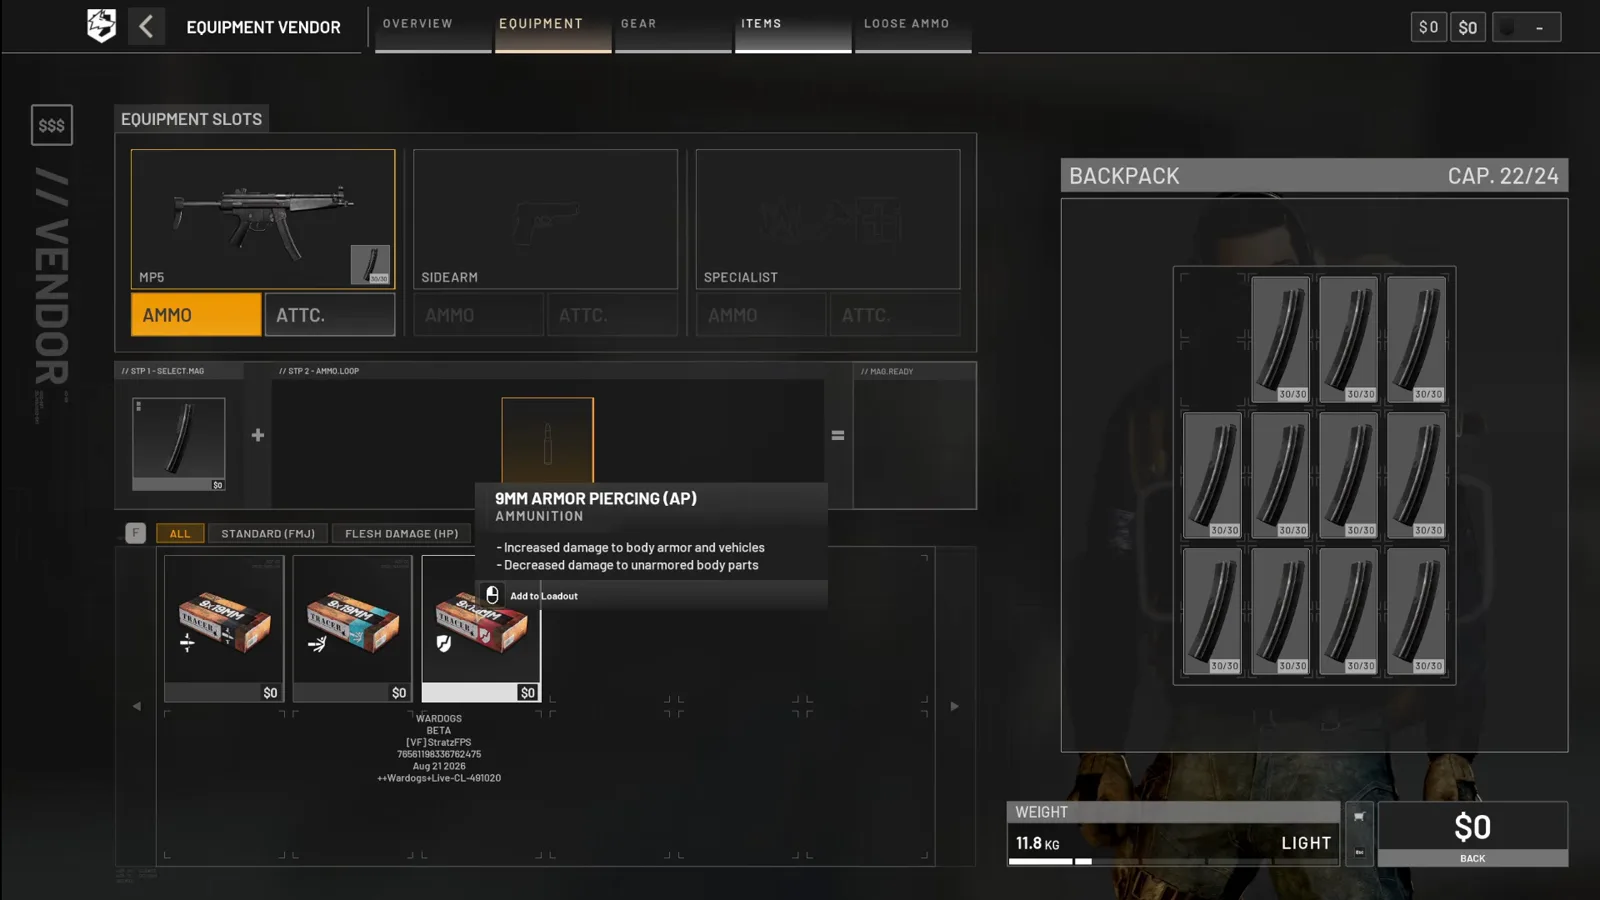 Step 6 (Timestamp: 00:54) — AP is a trade, and the tooltip says so. You pay for penetration with base damage against everything that is not wearing plate.
NellyJai quantifies the cost at 0.8x FMJ base damage, and puts the crossover at tier two armor, where FMJ and AP tie, with AP clearly ahead at tiers three and four. Fringe-Patriot Gaming’s launch-window measurements agree on the shape and disagree on the timing: against tier one armor he recorded 62 FMJ versus 58.7 AP on one 5.56 weapon, 46 versus 43 on another, and 32 versus 29 on an AMP-9 in 9 mm — FMJ winning every single one — before flipping to 48 AP versus 40 FMJ at tier three. SirSmoken’s numbers sit between them: FMJ ahead at no armor (25 vs 20), tier one (18 vs 16) and tier two (15 vs 14), AP taking the lead at tier three (12 vs 11 body, 23 vs 21 head) and tier four (11 vs 9 body, 20 vs 16 head).
Step 7: Resupply At The FOB Or From A Friendly Vehicle
You do not have to walk home. Parked inside a safe zone, a Kodiak shows the prompt B BUY AMMO / SUPPLIES on its rear panel — the same key that opens a vehicle’s logistics screen, and the fastest way to convert cash into magazines mid-match. The keybind strip on the right of the same screen lists Interact F · Change Seat O · Toggle Camera C · Free Look Alt · Locked L.
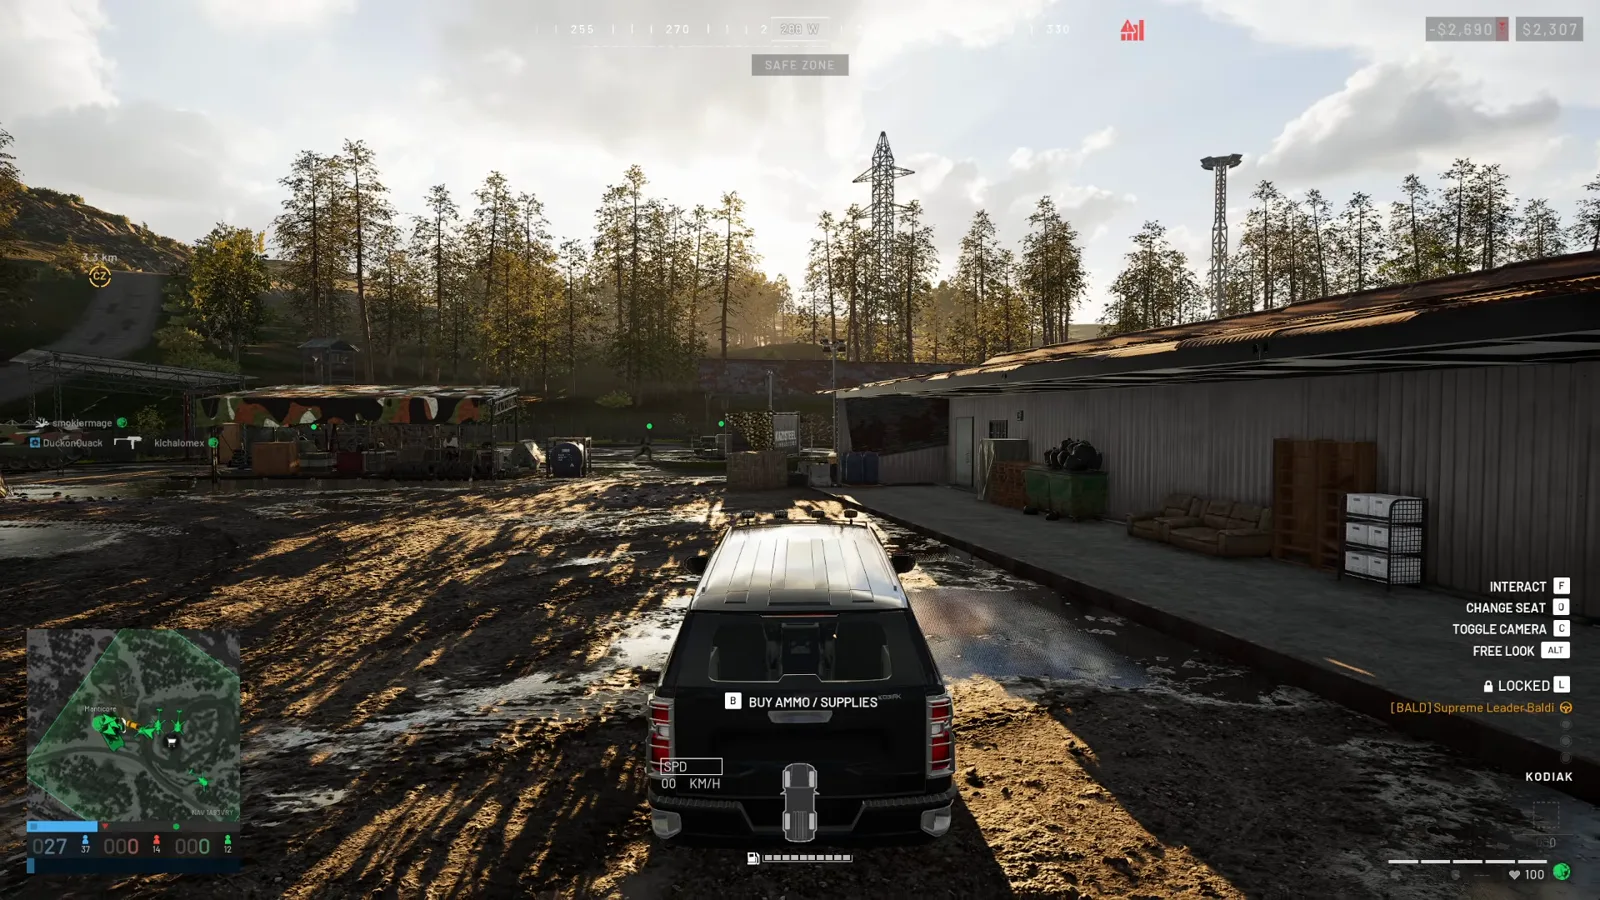 Step 7 (Timestamp: 00:44) — The prompt is the whole answer to “where do I get ammo mid-match”: a friendly cargo vehicle, inside the safe-zone ring, with
 B.
Pressing B opens the Garage Vendor → Logistics screen, whose top tabs split AMMO and MAGAZINES into separate categories from Utility, Primary, Secondary, Specialist and Attachments. That is where you buy the actual rounds; the Building sub-tab is where you buy the resource that keeps FOB weapons firing.
Watch the buy-ammo prompt and logistics tabs (00:44)
Step 8: What Ammo Costs, And Which Purchase Wastes Cash
Two different “ammo” purchases exist, and confusing them is how players burn money.
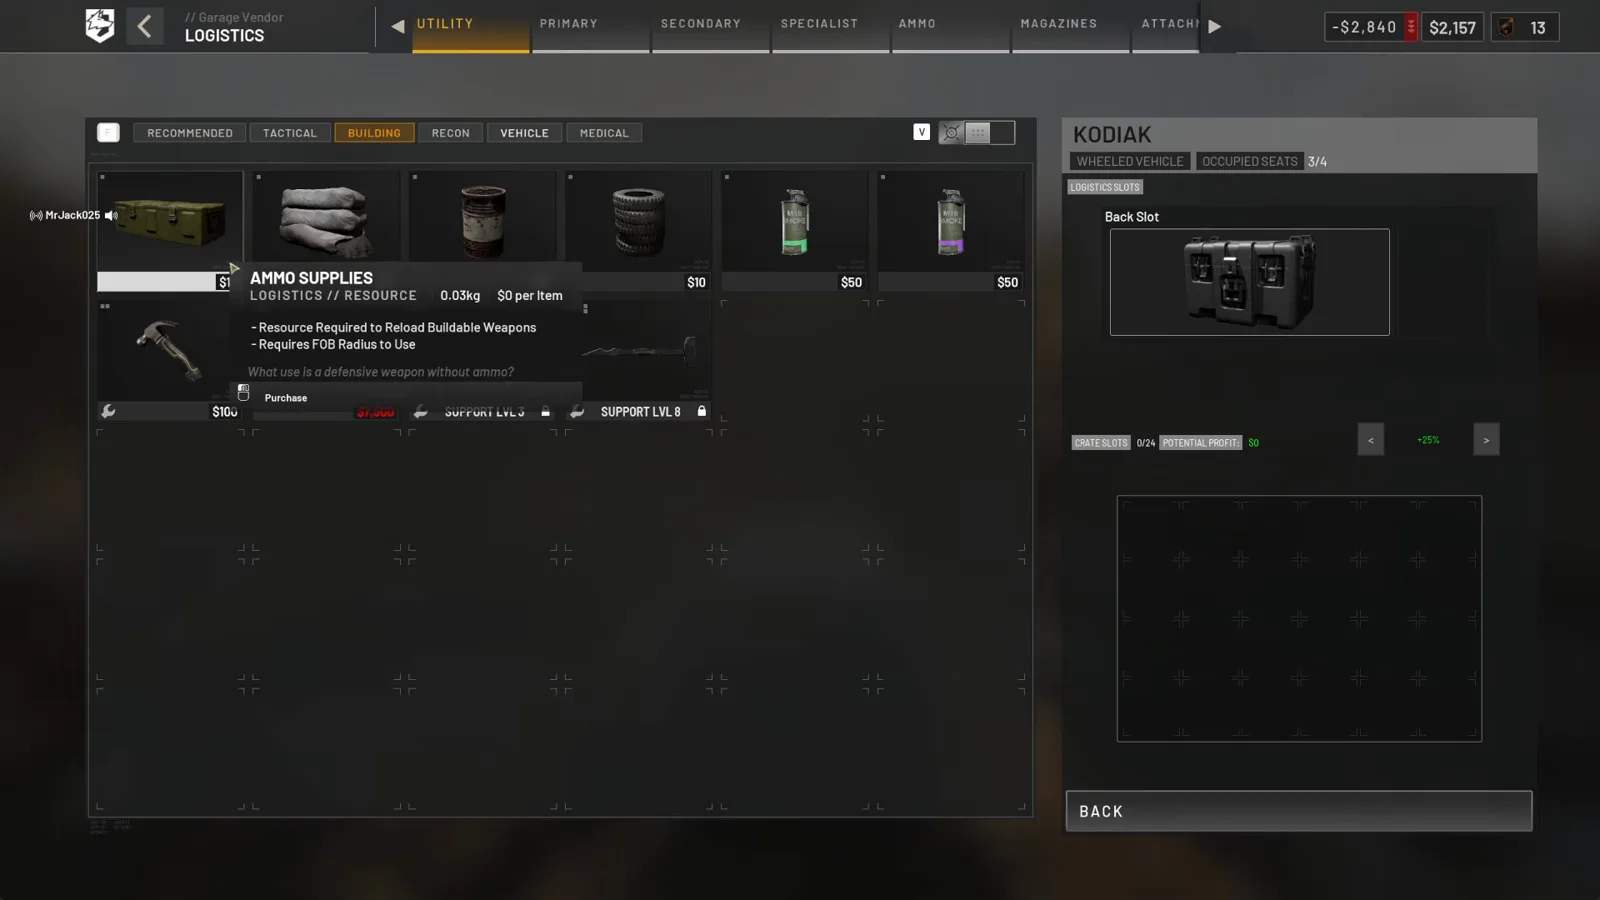 Step 8 (Timestamp: 00:56) — “Resource Required to Reload Buildable Weapons / Requires FOB Radius to Use.” This is emplacements ammo. It will not fill your rifle, and buying it instead of loose rounds is the classic wasted purchase.
Ammo Supplies is a FOB resource, not infantry ammo. It is what refills the mortar and the other FOB-emplaced weapons covered in our mortar walkthrough, it costs $10 per stack in launch footage, it weighs 0.03 kg per item, and it only works inside FOB radius. Mattzila 999 reports each $10 stack carrying 50 supply units in one inventory slot, and notes the part most players miss: if you stock a FOB’s ammo and a teammate kills someone with a weapon you resupplied, you collect the assist money. Supplying ammo is an earner, not just a chore — the full economics are in our money-making guide.
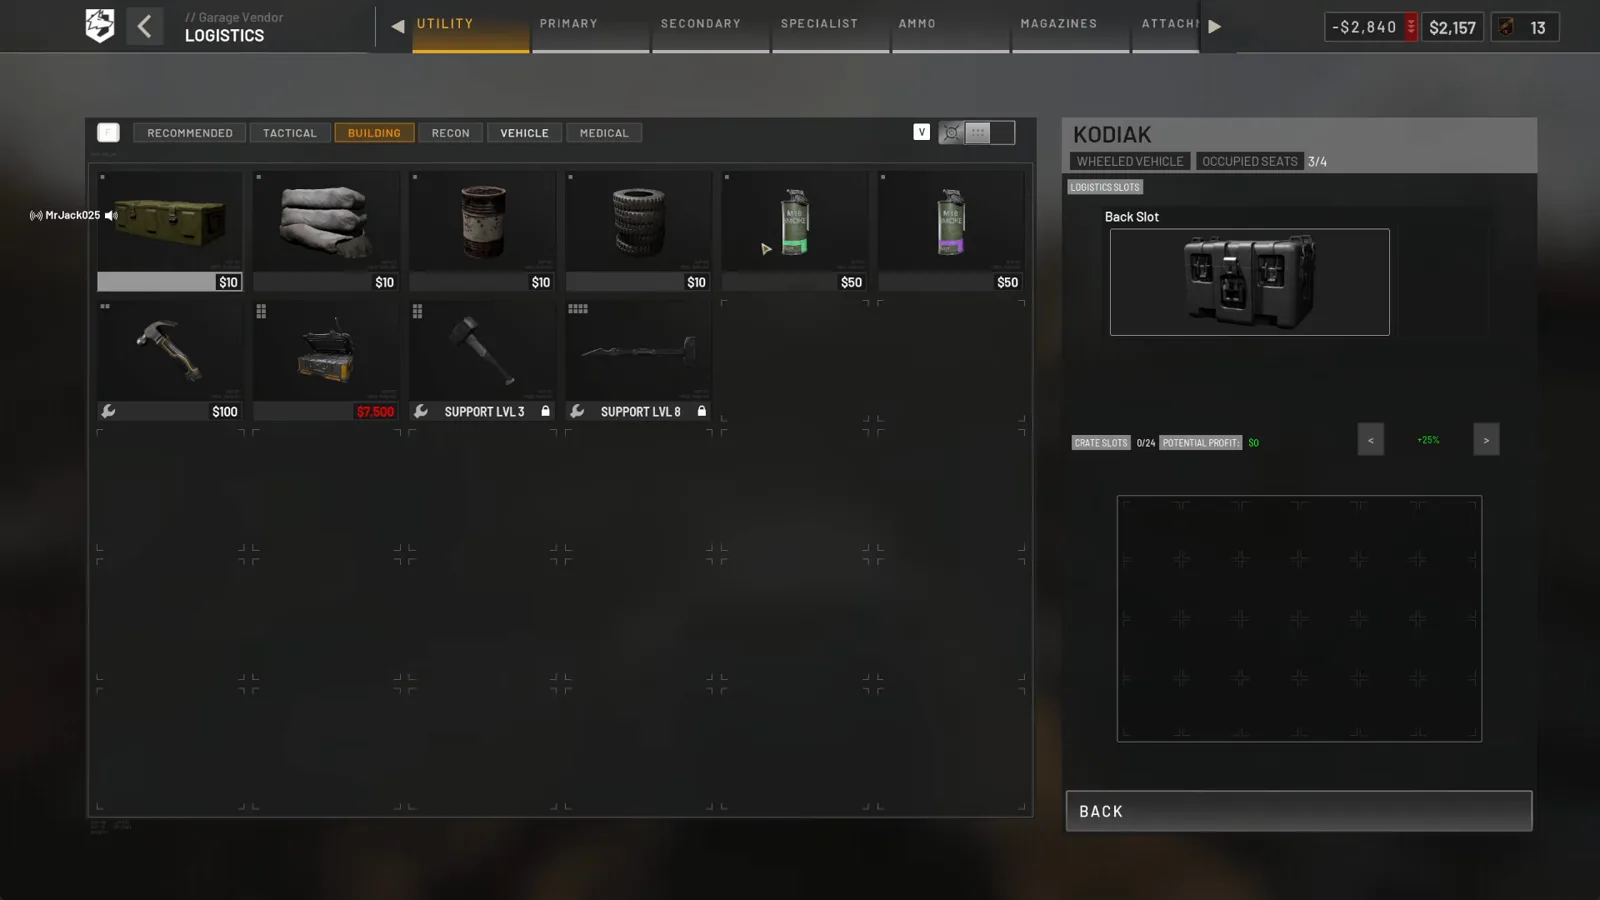 Step 8 (Timestamp: 01:00) — Ammo, build, fuel and mechanical all cost the same $10. The price tells you nothing about which one your base is short on; the FOB supply panel does.
Loose ammunition and magazines are the purchases that affect your own gun, and those are the ones we cannot price yet. Every readable vendor frame we have from the closed-beta build shows $0 for all three round boxes and the magazine, because the firing-range vendor is free in that build. Per-box rifle ammo prices are therefore unconfirmed for the live game — the same caveat our best loadouts page carries for ammo. What we can say is that the four FOB resource stacks cost $10, smoke grenades $50, the wrench $100, and the FOB laptop itself $7,500 in the same launch-era screen.
Watch the Ammo Supplies card (00:56) · Watch the supply prices (01:00)
Ammo Reference: Keys, Rules And Tested Numbers
| Item / Control | Value | Source |
|---|---|---|
| Combine loose ammo into a magazine | C (magazine dragged into inventory) | Ape Knight Gaming |
| Push loose rounds into a backpack magazine | Ctrl + Left Click | Ape Knight Gaming |
| Buy ammo / supplies from a vehicle | B | Verified on screen |
| Round categories in the vendor | STANDARD (FMJ) · FLESH DAMAGE (HP) · ARMOR PIERCING (AP) | Verified on screen |
| HP base damage vs FMJ | ~2.0x | NellyJai |
| AP base damage vs FMJ | ~0.8x | NellyJai |
| Armor reduction applied to HP | 90 / 93 / 97 / 99% at tiers 1–4 | NellyJai |
| Tier 1 armor damage taken | ~10% of unarmored | Fringe-Patriot Gaming |
| FMJ vs AP, tier 1 body (5.56) | 62 FMJ / 58.7 AP | Fringe-Patriot Gaming |
| FMJ vs AP, tier 3 body | 40 FMJ / 48 AP | Fringe-Patriot Gaming |
| Rounds to destroy a Little Bird (M249) | ~85 FMJ / ~67 AP | SirSmoken |
| Ammo Supplies stack | $10 · 0.03 kg per item · ~50 units per slot | Verified on screen; stack size community-reported |
| Starting magazine size | 20 rounds until the weapon is levelled up | StingKnight (alpha) |
Ammo Rules Of Thumb
- Never reload from loose ammo in the open. Carry a pre-loaded spare magazine instead; combine behind cover. The full reload discipline is in our beginner guide.
- Buy FMJ until you see tier three armor. Every tester who measured the crossover puts AP’s advantage at tiers three and four. Early in a match, AP is a downgrade.
- Treat HP as a playstyle purchase, not an upgrade. It only pays if you are deliberately shooting arms, legs and pelvis — and tier four armor deletes some of those hitboxes.
- Snipers are the exception. NellyJai reports a Mosin cannot one-tap a tier three helmet with FMJ but can with AP. If you are paying for a marksman build, the ammo is part of the kit.
- Do not buy FOB Ammo Supplies hoping it fills your rifle. Different system, different screen, different payoff.
- Ammo weight is real. The Ammo Supplies card itself reads 0.03 kg per item, and Platypaus’s first-$10,000 walkthrough makes the same point about loadout weight generally — heavy slows how you move, so buy the reserve you need for the fight, not for the whole match. Slot budgeting is covered in our best loadouts guide.
- Check the caliber before the box. Round cards are caliber-locked (
9MM,5.56X45,9x19mmon the magazine). Buying the right damage type in the wrong caliber is the cheapest way to waste a trip to the vendor.
Ammo mechanics were read off the vendor and logistics screens in StratzFPS’s closed-beta session (build stamp WARDOGS BETA, Aug 21 2026) and Quick Tips’s launch-week supplies walkthrough; damage figures were cross-checked across NellyJai’s armour model, SirSmoken’s full armour-tier sweep, Fringe-Patriot Gaming’s launch-window range tests and StratzFPS’s own MP5 numbers, and the combine-ammo keybinds from Ape Knight Gaming and StingKnight. Where testers disagree, both readings are printed. Early-Access balance moves fast — expect the crossover point between FMJ and AP to shift as armor unlocks get rebalanced, and re-check per-box prices once the live equipment vendor is readable.
Related Articles
fixes
WARDOGS Server Browser Not Working or Empty: Fixes
WARDOGS server browser empty or not working? Patch 0.11 split the Official and Community lists. Work this ladder: check the tab, clear filters, test server side.
guides
WARDOGS How to Buy a Vehicle: Vendor, Gates and Spawn
Step-by-step WARDOGS guide to buying a vehicle: find the vehicle vendor stall, read the Driver and Pilot level gates on each card, pay, then spawn and lock it.
weapons
WARDOGS Best Optic Guide: Attachment Slots, Traps, Ranges
WARDOGS attachment guide: what the optic, muzzle, grip and magazine slots really change, verified tooltip pros and cons, and which optic to pick per range.
Was this helpful?
Thanks for the feedback!